
So yeah, Like I was saying- I went off and folded my splitter. Since it was pretty solidly mounted it tweaked in the super soft sand and took the radiator, rad support, bumper- and a bunch of the custom fab stuff along with it. Luckily there was nothing other than superficial damage to the trans cooler and oil cooler in the off. It did let all the water out, which was a bummer because it made such a mess when mixed with the clay dirt at ButtonWillow Raceway. You can see how hard the splitter dug in... it just stopped in its tracks and I kept going.

Once I got it home I carefully pulled it off of the trailer and put it up in the air to peel back the layers of damage.

Here's probably where most of the coolant escaped from. Snapped the 'T' off of my water bypass line, after this it wouldn't have taken long to dump everything out of it.

You can see here where the oil line got tweaked into the radiator, again, lucky that none of the oil lines let go..

I also cracked my carbon fiber side skirts. Not the end of the world but just another thing that I would have to repair.


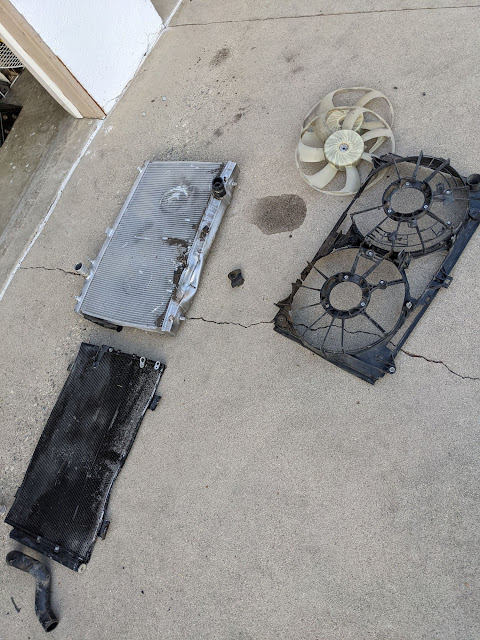
After pulling off the radiator I noticed that I cracked one of the two fan blades and the shroud. After looking up the parts I realized that Lexus a lot of their parts in these bundles. Unfortunatly for a repair like this one id have to buy both of the fan ECUs in order to get just the one fan and shroud i needed :shrugs:
Some other little things were a bit of a bummer too, like having broken the oil temp sensor. Not a big deal on its own becasue I have aftermarket data sensors, but stupid little annoying parts like this are 3x over priced at the dealerships if you want to get the OEM stuff.

Radiator support also comes in a few modular sections too, mine was toast so I added it on the list of parts id need to order. Another serious bummer was my AC condenser got punctured and the lines got tweaked too. Again, those are not cheap if you want to get the the OEM stuff.

I was starting to develop quite the parts list that i'd need to order if I wanted to get the car back to how it was before the off. After thinking it through, talking to a few buddies and really having a chance to inspected the damage I decided instead of just 'fixing'it i wanted to take the car to the next level. I'd decided that if I was going to put the effort into
building something back- I would want to improve on all of the things I had done the last time. Before it was always a quasi 'dual use' car that never really actually was. In fact I never drove on the street for pleasure. The only times it saw the wild was either the few seconds before I put it on the trailer, or do a 4am bonzai run to the racetrack. Driving this thing with the full aero package mounted meant a lot of crossed fingers and toes that i wouldnt run acrosss a bored CHP officer.
building something back- I would want to improve on all of the things I had done the last time. Before it was always a quasi 'dual use' car that never really actually was. In fact I never drove on the street for pleasure. The only times it saw the wild was either the few seconds before I put it on the trailer, or do a 4am bonzai run to the racetrack. Driving this thing with the full aero package mounted meant a lot of crossed fingers and toes that i wouldnt run acrosss a bored CHP officer.
Now that I was in the position I'd found myself, I decided.. "since I'd basically be building an entirely new front end, I should just embrace the situation and build it to better suit the only thing I actually use the car for." (i.e just strip it down, make it light, go faster on track.) This had a few solid arguments and this time wasnt just car-guy logic. As far as i could tell they were:
1. Freeing myself up from just ordering the OEM replacement parts and just throwing them on the car meant I could actually improve on the underlying structure. Improving it meant I wouldn't have to compromise on things like aero mounting or weight while trying to piggyback on the oem design of a car that was meant for a different use.
1. Freeing myself up from just ordering the OEM replacement parts and just throwing them on the car meant I could actually improve on the underlying structure. Improving it meant I wouldn't have to compromise on things like aero mounting or weight while trying to piggyback on the oem design of a car that was meant for a different use.
2. I would no longer have to Smog and register the car for road use. In California this is getting
harder and harder to do. Also not having to insure it would be a plus.
3. Even after all was said and done I'd actually probably save some money on things that I would no longer be needing to replace with Lexus-taxed OEM components. Along with that I could then sell the usable take-off parts id no longer need to make up the new modification costs.
After weighing the pros and cons of this plan, I was cemented that building an out-and-out track car just made sense.
Now that I had a direction to go I could start the process. First things was first; Id need to strip all the tweaked parts- and for that matter- all of the parts that were fine but that I would no longer be using.

Since I was no longer going to be running AC I was finally able to pull out the condenser, accumulator and lines. I was also able to pull out the heater core lines and the long-dead lines that ran to the OEM sandwich cooler that I'd not been using for a while. Not only was this all considerable weight but it cleans up the engine bay of extraneous things making it easier to service whats left.

Heater lines, before...

Heater lines (or lack there of) after... You can see that after pulling the heater lines off I would have to plug the holes. Normally people do vacuum caps, or nice silicone caps, but since I would never again need to use these ports, I decided to block them off more permanently.
Heater lines, before...
Heater lines (or lack there of) after... You can see that after pulling the heater lines off I would have to plug the holes. Normally people do vacuum caps, or nice silicone caps, but since I would never again need to use these ports, I decided to block them off more permanently.

I removed the housing and drilled and tapped them with m8 bolts.

Normally I'd weld things like this, but since this cast aluminum part had coolant in it for years I knew i'd never be able to clean it enough to be positive all the gunk was gone. Welding on stuff like this normally just pops and sputters and your never sure you'll get a leak free weld the first go round.
Not wanting to buy a new one, and not wanting to fill it with coolant only to find a pin hole leak i did the next best thing.
Tapped.

To add leak protection and to make sure it'd never come apart I JB welded the threads going in and smoothed some on the interior wall to ensure the flow was not affected and no coolant could push out. I did add an new t-stat while I was in there.

The other thing i did was decide to ditch the broken OEM oil temp sensor. It's only read by the cluster display and has no parameters going to the ECU for any reason. Since I didn't ever use mine because I have an actual number readout on my data system (and also because I didn't want to buy a replacement) I trimmed back the leads and wired an inline 1k resistor.
This means that the oil reading on the dash will read a steady 4 bars and not flash in error due to to the sensor being missing. After doing that i tucked the new resistor back up into the loom like it was never there. To block the now empty port I got a BSPT (not NPT) plug and hondabonded it into place. I am going to use the larger
and more sturdy black adapter where the temp sender was to run both of my oil pressure and temp gauges.

After ditching some of the waterlines I was also able to get rid of a few of the emissions related things. This waterline that goes under the throttle body is used to heat up the TB more quickly in cold climates. This get the car more quickly out of the closed loop cold idle and is better for emissions.
Since I live in sunny warm California, and since heating up anything on the intake on purpose makes no sense on a track car. I was able to lose these lines and get rid of another potential failure point.

This larger line underneath the manifold that comes off of the valley plate does need to be plugged by a silicone cap from HPS. This formerly fed the CAD coated lines coming down the front of the engine bay to the oil housing, which like I had said are now gone.

Now that I had substantially cleaned up some stuff, parts started to arrive. The guys from Koyo are friends of mine and saw that I popped my radiator, they are really good dudes and sent me a replacement.

For a bunch of reason$$ I decided to not use the restrictive OEM fan shroud and fans. Mainly because they were designed with the coolant overflow bottle mounting in mind, which i had ditched long ago. Instead I grabbed a SPAL fan off of my old racecar and built standoffs to mount the OEM dual speed fan ECU to it.


From factory the ISF has two fans that kick on separately under different conditions. This is done mostly to keep the cabin noise low. This single puller fan flows some serious CFM and its motor can take the Lexus pulse input needed to run it at multiple speeds just like the oem fan. Running only this single fan with no heavy plastic shroud saves considerably on weight too.
I am leaving my options open in case I need to run another fan, I just glue shrunk the secondary plug connector, but i highly doubt ill need it, but if I do its there. I know vettes running boosted 7 liter engines with a similar set up just fine.

After getting to a good stopping point to wait on parts I moved onto the interior. Since I didn't have AC refrigerant or hot coolant feeding the heater and blower anymore- I decided those could now go. In the name of weight I had wanted to pull these long ago but could never justify yanking out a fully functional system.
Now that they had no use I happily got to pulling the last of the low hanging weight out of the car. Make no mistake, this job is a huge pain in the ass but I was really curious to see actually how much it all weighed. Removing these was like finially scratching an itch after getting a cast removed
First creature comforts come out, then the dash comes out...

then the steering shaft, the cross support and all of the electronics..

Only then are you able to remove the blower motor and AC stuff.

After that was done I took a wire wheel and removed the remaining bits of sound sealer off of the floor in preparation for paint.


I also needed to block off the firewall holes to the engine bay.

I built some carbon slugs and chassis adhesive bonded them into place. (rivets are just there to hold them in place during the curing process)

I used metal etching self leveling primer then black enamel to spray the interior (its still wet in the picture) after a few coats it came out super smooth. While I was at it I thinned out a lot of wiring where i could.

After the interior was back in i built a carbon heel plate to make up for the now uneven floor.

The next week or so was spent just repairing carbon, building molds, laying carbon, waiting for it to cure, thinning wiring, sanding.. rinse and repeat.

1.5 oz headlight blanks getting cleared.

perfect fitment in the new OEM bumper skin.

Less pretty but extremely functional and sturdy repairs to the side skirt (pre-polish)


Built this 2.2 oz front grill so I can try an idea for the air intake.

You can kinda get an idea of it below, this is the ideal set up for me. Since I am venting the radiator exhaust out of my hood I want to block as little flow as possible. Currently the 90* bend in the intake tube a major road block for the air. Its also not ideal for power, so i plan on changing it. To accomplish this ill need to remove the oem hood latch and replace with some aero catch latches. This will fit around the corvette K&N intake i bought. After a bunch of measuring, and since Im tubing the front radiator support and can position everything where i want, i am going to sneak the intake tube over the top of the radiator with a scoop design as pictured below. The green is the OEM crash supports and my current undamaged bash bar, which i may or may not end up using. I have heard on LS based engines those guys see upwards of 10-15hp when shortening the intake tube.

I cut wide Aerocatch washers for the hood latches out of carbon stock i had

I also built this 2oz infotainment unit block off. Since I have nothing i need to control through it, it was just dead weight. This means that I can also thin out some wiring going to the back of the car.

Current underdash is completely gutted of all sound pads and vent tubes, the dash skin as it sits now weighs less than 3 lbs. Most of these plug wires will be thinned too- but its a slippery slope. Your effort to weight saving ratio has diminishing returns when you get down to this level of
nitty-gritty

Got the new size belt ordered that'll work for the pulleys sans AC compressor..

And my new splitter showed up. Its off of a NSX GT3 racecar that I am going to adapt to fit. I got it because of its amazing fit and finish as well as contour work. It also has the PERFECT ISF wheel diffuser width.

Wheel diffusers have spot-on trajectory into the wells behind the tires.

Super rough mock up, its all just resting on wheel chalks, but you get the idea of the fitment. You'll also noticed I completely cleaned up the headlight wiring and rewrapped the loom back to the fuse block.

Again, just resting in place. Trimming and fitment of the bumper still needed, and it most likely wont have as much protrusion as you see pictured here.


You can also see the CNC machined Jabroc skid material here.. Im going to look into laser scanning the skid pucks to be able to replace them with something cheaper and considerably lighter. These specific ones are 3k a PIECE from HPD and weigh 13lbs just for the lamanate impregnated wood. No thanks to that..


just beautiful to look at though.
Last thing i'll post that i'm working on is my "Single press" solution whats needed before i get on track. Pedal dance, Sport more and the push and hold TC for 3 seconds are all needed to be done individually to get the car into what i call 'partymode' this it annoys me considerably. I wrote some code in C++ Pi that runs on Arduino to accomplish this all in software. This will be sent into the appropriate ECU's from a stand alone and it will maintain the function of all the respective switches.
I already have it up and running on a test board, so all that's remaining is to test with the actual ECU then build the hardware circut and connections with the car. I've already started this part too- but its an interesting and difficult problem to solve. More on that later.
Here's a video of it in action. You'll notice the red and blue lights are the e-brake and the foot brake pedal sequence while the green led represents the SportMode push and the yellow led flash represents the push and hold on the TC.
https://www.youtube.com/watch?
OK that's probably enough. I still have a bit to do before its gotta get over to fabrication to bend and weld out the radiator support, mount the splitter and do a few other minor things. After that, it comes back and its only small finishing work before I can get it back on track.
So far, excluding the weight im going to save with the tubed radiator support, i'm already at -185lbs less than before I started all this, which is pretty substantial. I'm really trying to drop as much weight as i can and there may be a few more places i can find more. We'll see, like I said earlier, diminishing returns and all- but i'm already this far so why not.
and more sturdy black adapter where the temp sender was to run both of my oil pressure and temp gauges.
After ditching some of the waterlines I was also able to get rid of a few of the emissions related things. This waterline that goes under the throttle body is used to heat up the TB more quickly in cold climates. This get the car more quickly out of the closed loop cold idle and is better for emissions.
Since I live in sunny warm California, and since heating up anything on the intake on purpose makes no sense on a track car. I was able to lose these lines and get rid of another potential failure point.
This larger line underneath the manifold that comes off of the valley plate does need to be plugged by a silicone cap from HPS. This formerly fed the CAD coated lines coming down the front of the engine bay to the oil housing, which like I had said are now gone.
Now that I had substantially cleaned up some stuff, parts started to arrive. The guys from Koyo are friends of mine and saw that I popped my radiator, they are really good dudes and sent me a replacement.
For a bunch of reason$$ I decided to not use the restrictive OEM fan shroud and fans. Mainly because they were designed with the coolant overflow bottle mounting in mind, which i had ditched long ago. Instead I grabbed a SPAL fan off of my old racecar and built standoffs to mount the OEM dual speed fan ECU to it.
From factory the ISF has two fans that kick on separately under different conditions. This is done mostly to keep the cabin noise low. This single puller fan flows some serious CFM and its motor can take the Lexus pulse input needed to run it at multiple speeds just like the oem fan. Running only this single fan with no heavy plastic shroud saves considerably on weight too.
I am leaving my options open in case I need to run another fan, I just glue shrunk the secondary plug connector, but i highly doubt ill need it, but if I do its there. I know vettes running boosted 7 liter engines with a similar set up just fine.
After getting to a good stopping point to wait on parts I moved onto the interior. Since I didn't have AC refrigerant or hot coolant feeding the heater and blower anymore- I decided those could now go. In the name of weight I had wanted to pull these long ago but could never justify yanking out a fully functional system.
Now that they had no use I happily got to pulling the last of the low hanging weight out of the car. Make no mistake, this job is a huge pain in the ass but I was really curious to see actually how much it all weighed. Removing these was like finially scratching an itch after getting a cast removed
First creature comforts come out, then the dash comes out...
then the steering shaft, the cross support and all of the electronics..
Only then are you able to remove the blower motor and AC stuff.
After that was done I took a wire wheel and removed the remaining bits of sound sealer off of the floor in preparation for paint.
I also needed to block off the firewall holes to the engine bay.
I built some carbon slugs and chassis adhesive bonded them into place. (rivets are just there to hold them in place during the curing process)
I used metal etching self leveling primer then black enamel to spray the interior (its still wet in the picture) after a few coats it came out super smooth. While I was at it I thinned out a lot of wiring where i could.
After the interior was back in i built a carbon heel plate to make up for the now uneven floor.
The next week or so was spent just repairing carbon, building molds, laying carbon, waiting for it to cure, thinning wiring, sanding.. rinse and repeat.
1.5 oz headlight blanks getting cleared.
perfect fitment in the new OEM bumper skin.
Less pretty but extremely functional and sturdy repairs to the side skirt (pre-polish)
Built this 2.2 oz front grill so I can try an idea for the air intake.
You can kinda get an idea of it below, this is the ideal set up for me. Since I am venting the radiator exhaust out of my hood I want to block as little flow as possible. Currently the 90* bend in the intake tube a major road block for the air. Its also not ideal for power, so i plan on changing it. To accomplish this ill need to remove the oem hood latch and replace with some aero catch latches. This will fit around the corvette K&N intake i bought. After a bunch of measuring, and since Im tubing the front radiator support and can position everything where i want, i am going to sneak the intake tube over the top of the radiator with a scoop design as pictured below. The green is the OEM crash supports and my current undamaged bash bar, which i may or may not end up using. I have heard on LS based engines those guys see upwards of 10-15hp when shortening the intake tube.
I cut wide Aerocatch washers for the hood latches out of carbon stock i had
I also built this 2oz infotainment unit block off. Since I have nothing i need to control through it, it was just dead weight. This means that I can also thin out some wiring going to the back of the car.
Current underdash is completely gutted of all sound pads and vent tubes, the dash skin as it sits now weighs less than 3 lbs. Most of these plug wires will be thinned too- but its a slippery slope. Your effort to weight saving ratio has diminishing returns when you get down to this level of
nitty-gritty
Got the new size belt ordered that'll work for the pulleys sans AC compressor..
And my new splitter showed up. Its off of a NSX GT3 racecar that I am going to adapt to fit. I got it because of its amazing fit and finish as well as contour work. It also has the PERFECT ISF wheel diffuser width.
Wheel diffusers have spot-on trajectory into the wells behind the tires.
Super rough mock up, its all just resting on wheel chalks, but you get the idea of the fitment. You'll also noticed I completely cleaned up the headlight wiring and rewrapped the loom back to the fuse block.
Again, just resting in place. Trimming and fitment of the bumper still needed, and it most likely wont have as much protrusion as you see pictured here.
You can also see the CNC machined Jabroc skid material here.. Im going to look into laser scanning the skid pucks to be able to replace them with something cheaper and considerably lighter. These specific ones are 3k a PIECE from HPD and weigh 13lbs just for the lamanate impregnated wood. No thanks to that..
just beautiful to look at though.
Last thing i'll post that i'm working on is my "Single press" solution whats needed before i get on track. Pedal dance, Sport more and the push and hold TC for 3 seconds are all needed to be done individually to get the car into what i call 'partymode' this it annoys me considerably. I wrote some code in C++ Pi that runs on Arduino to accomplish this all in software. This will be sent into the appropriate ECU's from a stand alone and it will maintain the function of all the respective switches.
I already have it up and running on a test board, so all that's remaining is to test with the actual ECU then build the hardware circut and connections with the car. I've already started this part too- but its an interesting and difficult problem to solve. More on that later.
Here's a video of it in action. You'll notice the red and blue lights are the e-brake and the foot brake pedal sequence while the green led represents the SportMode push and the yellow led flash represents the push and hold on the TC.
https://www.youtube.com/watch?
OK that's probably enough. I still have a bit to do before its gotta get over to fabrication to bend and weld out the radiator support, mount the splitter and do a few other minor things. After that, it comes back and its only small finishing work before I can get it back on track.
So far, excluding the weight im going to save with the tubed radiator support, i'm already at -185lbs less than before I started all this, which is pretty substantial. I'm really trying to drop as much weight as i can and there may be a few more places i can find more. We'll see, like I said earlier, diminishing returns and all- but i'm already this far so why not.