"It's been quiet, only cuz I been busy" - Kool Keith
So, planning didn't go to plan.
My initial intention was to drive on the stock GTS brakes with upgraded pads and lines until I felt the need to switch to something bigger. I felt confident in my plan from reading and seeing what I thought were stock GTS brakes on a few TRD N2 race cars. After going back and reading more and more into it I found out that what i though were OEM calipers were actually a cross chassis hybrid pieced together by TRD. They consisted of Cressida dual pot front calipers using a custom bracket and twin cylinder MC set up and at the rear OEM calipers but with a different pad compound. Since the N2 cars were the pride of Toyota it makes since they used whatever they could source from the factory floor.
This realization alone wouldn't swayed me from my original plan if I wasn't pressured into rethinking by other factors too.
As I was saying earlier on in the blog, mounting provisions for the seat will be incorporated into the roll cage. To do so requires me to significantly alter the driving position- To do that I'm going to have to get a new pedal set, and to do THAT ill need to know the ultimate front piston size so I can calculate: fulcrum point, pedal ratio, pedal stroke, master cylinder ratios and balance options for the front and rear. Once i start to work that out i can select the best pedal set up for height space and leverage... the head bone is connected to the wallet bone, im convinced....
An added bonus to a standalone pedal set is it simplifies brake light wiring to an inline pressure switch. Its stuff like this you'd want to sort out before having a custom harness built.
The more I read about brakes the more I realize that practically no one understands what it takes to correctly balance them (myself included) Most times id just throw on an upgrade and fit another bigger master cyl with only a vague understanding on what exactly its effecting and how there may have been better ways to accomplish what I was trying to do.
If anything, again, this build has shed light on what it takes to figure something out from scratch and a corner stone figuring this out starts with nailing down the total caliper piston diameter.
Changing this in the future (al la, swapping calipers later on) massively complicates what i buy now in hopes of using later on.
EVERYTHING in this arena is cross dependent on something else- an in the end the math dictated that eating what id spent already on pads, rotors and caliper rebuild would be far less in both effort and $$ than if I upgraded in the future.
MUCH MUCH more on this process to come in future updates as I dial it all in..
So, as i was saying.
After much research, I ended up buying some Mazda Rx7 FC3S calipers. ill explain..
There was only really 3 contenders on my search. RX7 and Wilwoods. With the Wilwoods you have a choice between the Dynalite or Dynapro calipers. The Dynalite calipers are what come in most AE86 specific brake kits and are the older of the 2 caliper designs. While good, and certainly better than OEM, they are more prone to flex and uneven pad wear. Flex in a caliper that is not brake boosted coupled with shorter stoke pedal (both of which are planned on my car) can cause big losses in brake torque that you cant account for with other components. It just *is*.
Wilwood caliper 2, the Dynapro, is the more expensive but a newer and revised design version. They have smaller production runs and need a 2 piece rotor. While a 2 peice is better in design, they cost significantly more money (by a factor of 4x) for a wear item that WILL need pretty frequent replacement. For perspective replacing just disks and hardware on the front of my Stoptech kit cost about $700 bucks. nope.
Third choice: The FC3S rx7 brakes are beefy, so no flex issues to worry about. For such a rigid design they still only weigh 5.6lbs and are made of forged aluminum. They also come finned for better heat dissipation. Did you know the rx7 was one of the first production cars to come equipped with a semi metallic pad? Neither did i, but thats why these were ever engineered from the get go. Also one of the biggest selling points too me overall was the rotors that are used in the kit are readily available off of a 2003 mini cooper S.
This news was a double bonus since I know Civic track guys use this same rotor when upgrading to GSR calipers. This means, if ever in a pinch i could probably even find someone at the track that has a spare disk with them.
And finally the FC3S actually has MORE caliper piston diameter @ 32.4mm x4 PER CALIPER than both the Wilwoods
That is a huge upgrade from the single piston 50.8mm GTS caliper that I was planning on running.
Once I had all this figured out I bought some new refurbished Centric calipers with new clips and hardwear. Bracket is a custom C&C aluminum peice from Silvermine Motors I also bought some 'good enough' slotted rotors that ill run till dead and replace with some decent blanks.

 |
| close up on the pots |
 |
| thinking about grinding off the 'mazda' logo. Part of me wants too keep it. |
In other parts news my motor mounts finally showed up from Japan, new in TRD bags. They are something like 35% stiffer than the factory GTS mounts whch should be plenty to deal with the power of the new motor.

Also from Japan, picked up a Cusco 5th link panhard lowering plate. This welds onto the axle and lowers the attachment point of the 5th link. Surprisingly, (or not so surprisingly) moving this attachment point is often overlooked when lowering an ae86's. It works similar to the traction brackets you'll see for sale but accounts for correcting the rear end movement on the X and Y axis
When using shorter suspension you lower the chassis on top of the wheels but the distance from the axle to the road stays the same. In a 5 link suspension the pan hard bars radius of movement are supposed to match the length of the rod itself. Yes, you have some adjustment with the heim joints on an after market bar but just shortening them down shrinks the radius arc outside that of the other 4 link bars.This amplifies its leverage on the outside tire in a turn and will manifests to the driver as a tighter more twitchy rearend. It will also increases axle skewing and rear steering under load. Excessively lowering an 86 without re adjustment and your basically using an inverted panhard where the forces pushing down under cornering will act like a piston and push back up into the chassis dynamically raising your roll center mid corner.
Maintaining correct spacing where the bar is still a few degrees inclined while static (flat under compression) will induce a more neutral balance that can be fine tuned with spring rates and sway bar instead. It'll also save drive shaft joints and LSD from failing before their time and generally keep you looking like a douche crab crawling around the track.

5- link solid axle is a VERY old suspension system and has TONS of fundamental faults in a road racing application. I have something else in the works that will pair with this modification that will 'help' these shortcomings but not lose what I think is one of the ae86 most unique characteristics.
Also showed up was the steering wheel disconnect. I settled on the Sparco race which welds directly onto the steering shaft. Unlike the WorksBell unit i was looking at this has a spring loaded spline instead of the tensioned balls that have become standard. It offers 200% more contact surface between the two halves to share the load. Its the actual part that some WRC rally teams use and doesn't require the additional 3 to 6 hole steering wheel adapter the WorksBell unit does.

The finish on this thing is top notch, and the 'CLUNK' noise it makes when it seats is very satisfying.

Next up, the 'Forever Backordered' mini latches finally decided to trickle in. I got two from Nebraska, one from Maine, one from Nevada and the last one shipped directly from the supplier. Ive used these on the NSX to attach my splitter and as a bit of extra safety in holding the carbon hood down. I really like this product.
Each latch is rated too 150lbs of pulling force but pops off with a button. The uses are endless but I plan on using these in addition to toggle straps on the carbon trunk lid so it can easily be lifted off for refueling but wont go anywhere when snapped down.

FIIIINALLY got a huge box from the Honda parts warehouse of odds and ends id been waiting for. I think it took so long because they had to source some pretty oddball parts.
Assorted gaskets, t-stat, a few replacement rubber rings and OEM plugs

You can never have enough Hondabond HT, ever.

I needed a single piece of the transmission bracketry along with the much more common mounts.

I'd wondered how all this fit, and I could never find any detailed pictures of it together off of the car on the net.
Since my car came with a different type of set up I assembled all this just to make sure that I have all the correct parts.


Here's a couple of it bolted onto the trans for anyone that's searching for a picture like I was, I'm using lock washers on the non dampened side of the mounts for the nuts that wont be easy to inspect once its on the car.


Another rare parts request; Throttle cable alignment bracket.

Below is how the one looked that came on the car. You can see it hanging left of the gold bolt head, Not sure what type of car it was off of but it had been hacked short and drilled so it was only being attached by a one of the two studded provision in the intake manifold.... I have no idea... Im almost positive at the angle that it was attached the car was frighteningly close to having a stuck open throttle.
 |
| ummm whu? |
annnnnnnd fixed.

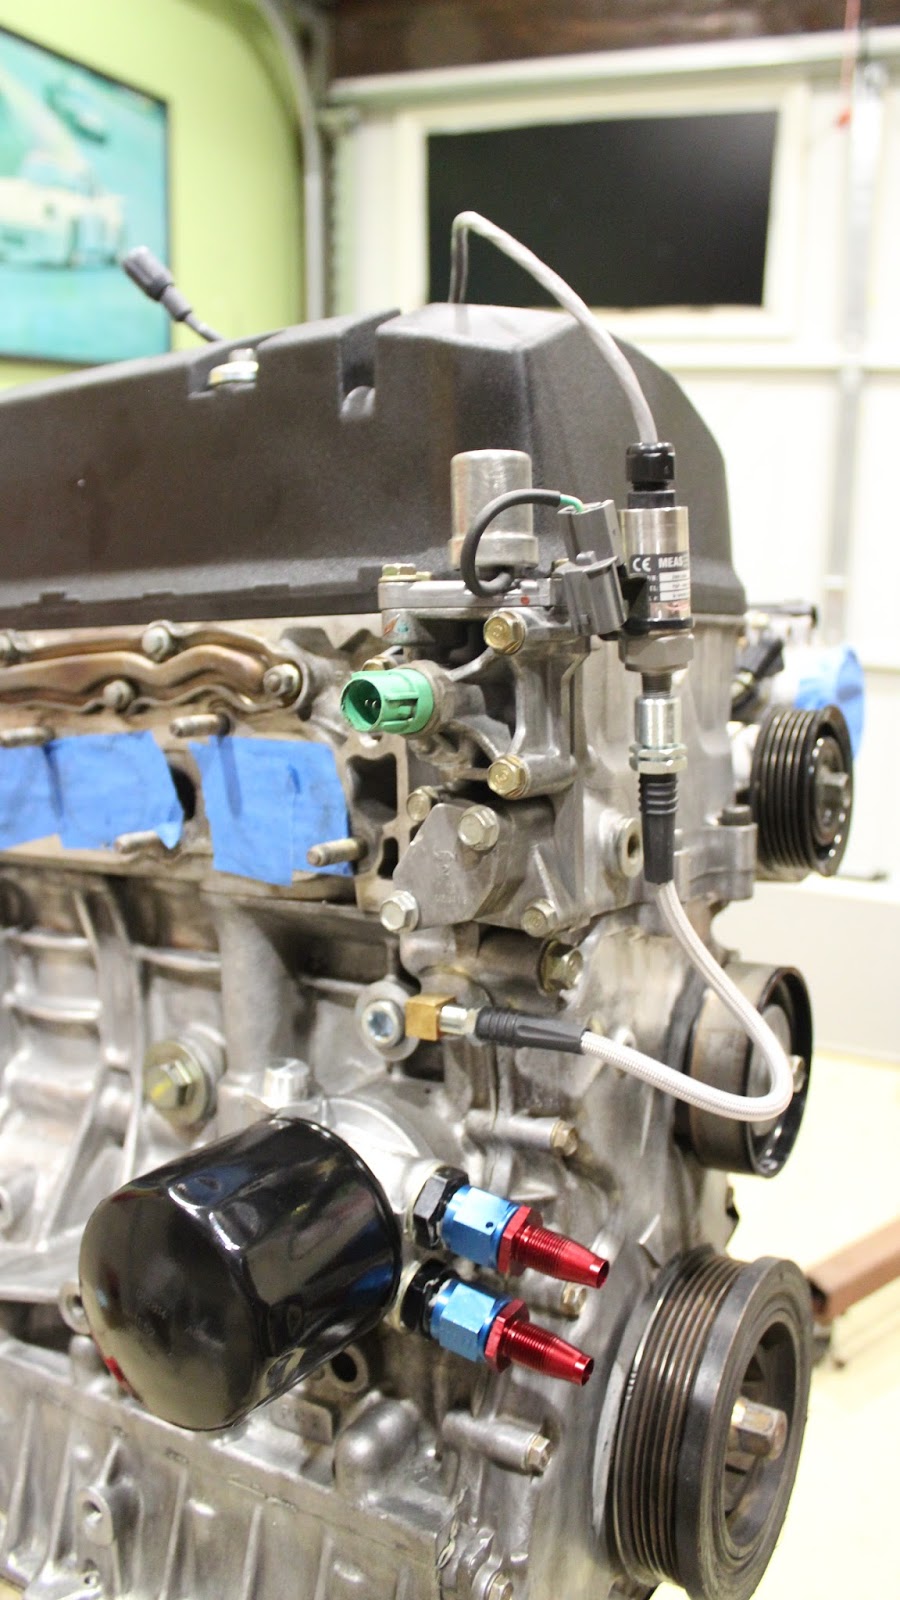
For sometime id been sourcing different NPT/BSP/BSPT adapters and deciding on which format is cleanest and safest to run my oil pressure from. As I think I mentioned a few posts ago i'm hijacking the OEM oil pressure warning light port. Its a self grounding switch so there wont be any dash light to annoy me once its gone. In its place im going to use the pressure switch that shipped with my gauges, they are high quality MEAS units but are quite big and have a uncommon in Japanese car NPT threading. The motor on the other hand has a provision for a 1/8 BSP, you can see below how far out the pressure sensor sticks when threaded in with the adapter.

Here is a much more elegant solution using a 90* adapter and stainless braided line to take the weight off of the thin vibrating aluminum of the engine block and move it up to the steel vtec solenoid bracket and away from the heat.
Theres more, but enough for now. Next time chassis updates!
Did you say Solid Aircraft riveting and cage progress? Oh yes.


I like the work you did on this engine!
ReplyDeleteHow did you attach the Mocal sandwich plate without the oil cooler/heater adapter?