A little shorter space between blogs than usual, been a busy couple months so i wanna get it down sooner and hopefully keep these entries short and sweet.
After last entry I decided to cut different end plates for the new wing, I ordered some 1/8 thick carbon and cut the new Delta plates with larger drop. Not only do they look cooler but at larger ratios they can actually decrease drag. The ones here are double the height.


After this I sent the car over to Chris at Wisecraft fabrication I needed to get the steering column mounted correctly which required a bar or tab to be welded off of the existing dash bar. I also needed to have the exhaust routing fixed so I wasn't just dumping it before the diffuser and disturbing the air flow under the car. With the shorty exhaust I had been running the sound inside the cabin is crazy loud, which made my ears ring even with ear plugs after 20 min stints. The idea was to route the new exhaust to the back under the diffuser and exit it from the passenger side of the rear bumper. This would quiet things down considerably but also allow me to build a "Laguna Seca" add-on portion which would quiet things down even further for tracks with strict dB rules in place. Ideally this piece would be modular and easily attached to a rigid mounts so it could be swapped on and off in a matter of a few min. To accomplish this i'd likely be looking at a redesign of the rear wing mounting and how it attached to the OEM beam. I'd been running it like this for a couple years now and I was curious to see if there was any fatigue or cracking in the set up. I had only run the studs mounted to the OEM bar at the time because the SuperMod class I was running in required me to maintain the factory crash beams. We knew at the time that building a different bash bar would be the better solution but there was nothing we could do. Now that I run in a different class that didn't have the OEM beam rules, we were free to build it however it needed to be.
Chris built a bash beam and reinforced the chassis mounting with an extra stud as this would now serve as the wing mounts and the mounting for the extra muffler add-on.

The wing studs would still come out of the bumper plastics in the same point as the holes that we'd made on the last go around. Visually not much would change.

Chris then made up a stainless header back exhaust with a new resonator and muffler out of 2.5 inch tube.

I also brought him a weld on heat shield for the muffler section that passes the fuel cell. This heat blanket will keep the fuel from getting hot and vaporizing due to it proximity to the exhaust.

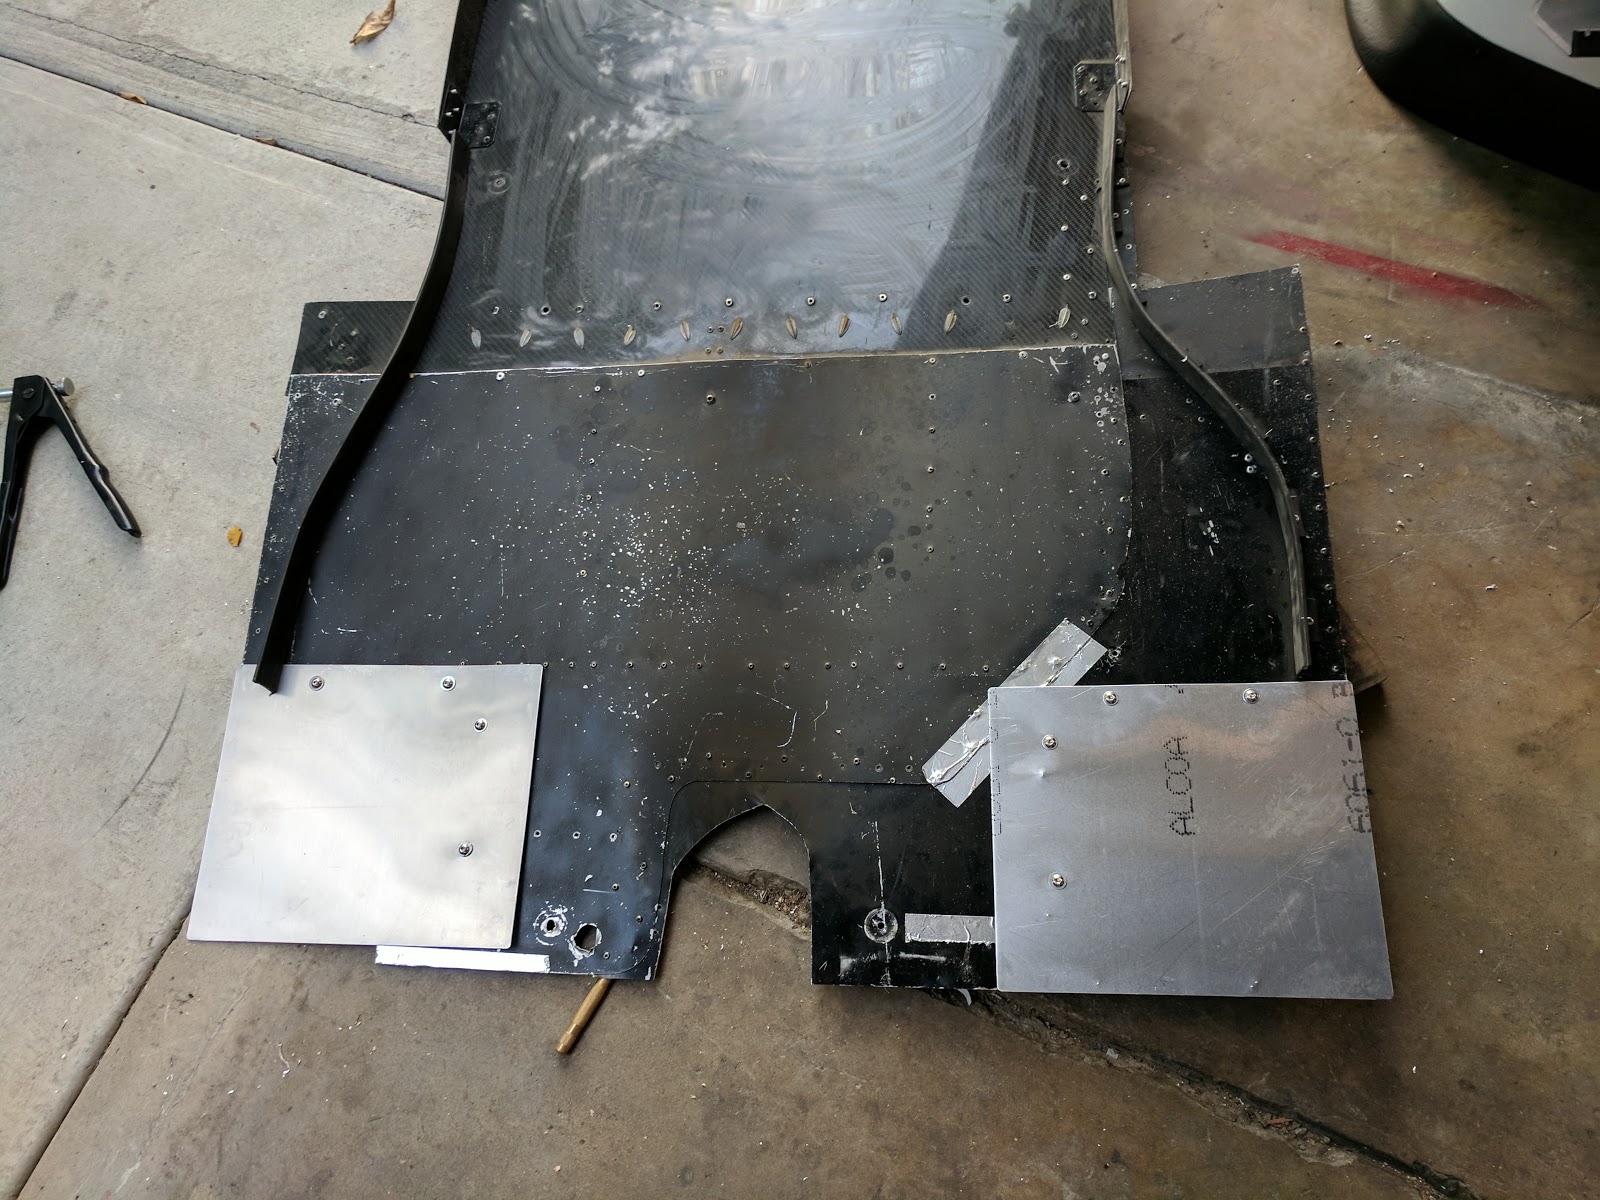
Below, you can see the mini-latchs will be used to hold the rear bumper cover in place. I'm using these in order to get rid of the complicated original brackets with the million screws that hold everything together.


Now that the new bash bar, studs and exhaust were fabbed Chris v-banded the end of the muffler section and attached it to a huge Vibrant muffler and flex pipe- that then is attached to a stanchion that straddles the two wing mounting studs. You can see also Chris built a heat shield on the back face of the muffler to keep it from cooking the paint off of the bumper.

Really happy how this thing turned out. Best of all it QUIET like a stock car when attached. Only x2 17mm bolts and a 10mm v-band clamp and I can have it on and of the car, ready to go to Thunder Hill, Laguna Seca or Sonoma. I really cant wait to use thing thing.

Looks pretty badass to.

Now that the exhaust was built the last thing to do was mount the steering column. Chris put a drop down attachment built out of 1 5/16" tube required by the column clamps.

Here you see it painted with the steering column installed. An additional clamp attachment was added to the base of the steering shaft to hold it straight.

Now that I had the car back home with the new exhaust and optional attachment I set to work building a switch to toggle between tunes on the ecu- one for the car when running the exhaust add on one for without. The S300 ECU has the ability to store and select different tunes on the fly. For example you can tune your car with one turbo boost setting then, on the came ecu, tune in another boost setting profile. Both these different fuel curves can live in the computer and are activated based on pre determined parameters. Similarly my the new exhaust would have different much different back pressure characteristics with the dB attachment on or off. Having the same tune run both versions probably wouldn't kill the motor but it wouldnt be ideal for engine safety and power standpoints. Since I had the option im going to utilize it. I hijacked the power steering pin in the ecu and would use its signal of 'on' or 'off' as the switch perimeter for the two different fuel maps- each one tuned specifically for its own exhaust configuration.
I used a military 'wash down' grade sealed switch mounted onto the ECU plate. I'm curious to see what the HP and TQ differences will be with one exhaust fitted over the other.


Next big item that i have been considering for a while was to become self sufficent for my own alignments. Having to take my car in somewhere after doing any suspension or steering rack changes gets old. I have to take a day off of work get the car onto the trailer and tow it about an hour south though traffic to get to Westend Alignment. They are the absolute best in the business in SoCal as far as alignment and corner balance of a race car; but its far from convenient for me.
In the past id postponed a few upgrades or maintenance only because I wasn't going to have the time to get the car properly aligned before the next event. Also the inability to fine tune alignment specs per track was also unfortunate. This year I wanted to make a big push on understanding and recording car setup, this means things like actual tire temperature, asphalt temperature and how camber and toe effect the tire pressures and car feel would all need to start to get recorded with a bit more accuracy than i had in the past. And, to this end, id need the ability to accurately make these changes on my own at home.
I decided it was time to make an investment in Hubstands and leveler pads and alignment strings. The gear up cost is pretty substantial and cannot be justified as far as thinking about how many alignments id need to do myself to effectively offset it's cost. The value to me, rather, is in the convenience and ability to do this in house on my own whenever i feel the need, even if it was just to try something.
 |
| Add caption |

The leveler plates I had purchased came built as angled bars welded together, they are meant to house scale pads that will allow you to corner weight a car. I decided to save a bit of money and forgo the scales for now as I just had my car corner weighted and don't have plans to chance the ride height anytime soon. To use the levelers without scales I had some 1/4 inch aluminum sheets cut so the hub stands can sit inside the cradle.

I found that a standard Bosch horizontal level sitting on the plate will perfectly line up with the bottom of the hub stand foot. I level all the pads to each other by shooting the laser from one pad to the next, front to back, side to side then finally corner to corner. Once they are close I use 4 bubble gauges to level out the pad then repeat and re level to each other as needed.

The initial set up takes the most time, especially if your ground is as off as mine is. Once its done the first time you can mark everything and leave it alone for future use. The next time I set the whole thing up took me 15 min instead of two hours.

Once the car is on the Hubstands you attach the alignment rod. I shelled out extra for a digital camber gauge and cradle, you can see it below. Its a fancy magnetic arm that attaches the gauge that allows you to easily and accurately read wheel inclination.

To make changes to the toe links in the front you need your steering wheel to stay straight. I clamped it in place with a steering wheel holder, this one was like $30 bucks off Amazon and does well enough.

Then attach the Smart String alignment system. Smart Strings are not a 100% requirement, if your comfortable enough with geometry to properly 'square' your car you can use some jack stands and fishing line. The $600 price tag is a tough pill to swallow but i can use these on any car and offer a quicker and more repeatable set up than any other option.

Now all you gotta do is simply measure the string distance from the center of the hub to the alignment rod which needs to be exactly the same front to front and rear to rear. Once you triple check you are square its a matter of measuring the front and back of the alignment rods to the string and making adjustments to achieve you desired alignment settings. For me 0 toe and -2.5 to -3.5 negative camber ...depending.

As luck would have it I got the car finished just in time for the HFF Challenge double header weekend. I was done on a Thursday night and I signed up to run that coming weekend. This would be the first event back with the new motor and all the new odds Id be lying to say i wasn't a tab bit nervous.

I got to the track on that Friday to get a good spot for all the other HFF guys

I got a chance to drive the car around the paddock and dial in pressures etc before the next days morning sessions.

A pretty cold night in the truck and I was all set for the next two days.

The next morning the car felt good. I started slow and made sure that the steering and alignment felt right on the track. first session at 7/10 speed I was already in the 1:58's

Next session as i wond it up I managed a 1:57:2 for the HFF unlimited class win for the day. We were logging pressures and I was solidly improving sector times when the car started to sound a little 'off'. I was getting a weird misfire on the straights and i pulled it in to check things out.


I pulled the head off and checked the retainer tops... sure enough, the new head had the same problem as the previous two.

Something was causing the rockers to come into contact with the new spring retainers. At this point it was a no brainier that the head core was the problem. It had to be that there was something off in the casting that was causing this issue time after time. I had literally changed everything else out twice before and had three different engine builders assemble the head, the chances of all of them messing up the same way and causing this same problem to appear three times in a row was very unlikely. This of course was a bummer because I have all of this money tied up in this casting for the port job etc.


I put the car back on the trailer and just hung out the following Sunday. It was a huge bummer to have only been able to run maybe two session but like with all the other times that the car worked, it was tantalizingly good.
Like its normal at this point, I got the car home and starting taking out the motor.

I'm so fast at taking this motor out at this point its not even funny.


I had decided that I was going to buy a 100% bone stock Japanese Type-R motor and run that. Id do some minor maintenance but other than that leave it bone stock. No cams, No cam gear nothing fancy. The hope was that this would just allow me to actually drive the car for a while, even if it would be down on power it'd be better than not driving. I had Katman come over and reset my ecu to run an OEM Type-R motor with the Coil on Plug conversion and set up datalogging.

The next Saturday I had picked up my new Type-R long block from Honda Motors Online which conveniently to me is 8 miles from my house.

I set to work pulling off all of the stuff that I wouldn't need off of the new long block and preparing it to go into the car.

New plugs are a must for any motor that is going to see track time.

While it was out of the car i also took the opportunity to clean out the intake and exhaust ports on the head. For the exhaust ports I turned the crank until i closed the valves and used a dental scraper and spray cleaner to blast and chip off all of the old built up carbon deposits. From the looks of it, this motor was last used by someone pretty irregularly. the carbon build up is indicative of a car that does not get up to temperature or driven hard before it is shut off. The intake side was relatively clean had what looked to be streaks the red recharge oil off of a K&N intake filter.
 |
| gunky |
 |
| clean |

 |
| All 4 exhaust ports done |
 |
| Intake cleaned |
Once it was all clean i pulled off the water bypass sandwich plate off the motor and installed a non sandwich plate thread holder to run to my external oil filter.

After some personal debate I decided that I would want to change the Oil pump, water pump, Timing belt tensioner and pulley, cam seals and timing belt. Because I had to get to the oil pump I decided that i would swap the ATI crank pulley off the old motor and put it on this new one.

I pulled off the cam caps and was able to have a nice unobstructed view of the cams and rockers themselves. Everything looked good.


After changing seals i re torqued the cams back down and reset the timing on the cam gears.

This cool tool helps keep the cam timing aligned while I was working.

By this time the new oil pump and water pump finally showed up. I decided against removing the 4-piston oil pump from the old block and just went with a new OEM one. I'm deciding if I wanna build another monster head and slap it on the old 'new' bottom end that had just come out of the car since its a fresh rebuild with one and a half sessions on it. I could theoretically run the OEM spec long block and slowly build a kick ass race motor on the side and just swap over in the future. Still debating whether its worth it to do this. I have noticed that oem parts for these motors are getting harder and more expensive to find. This oil pump for example went from $175 two years ago to $280.
 |
| old v new |
Water pump on and oil pump off.

New plastics, cam seals, new tensioner and pulley. New water pump and oil pump on. Also swapped over my 5qt oil pan with temp bung and oil feed plate.

Clutch and flywheel on, then on goes the trans.

Back in the car in about a week and a half's time after removing the old motor.

I also took the chance to swap out the Radium fuel filter element.

I'd also noticed at the last event that the shiftier was starting to feel sloppy and not letting me shift into second quickly. I noticed that even in gear the shifter had at least 3 inches of play side to side.

I had a couple moments where i crunched gears so to alleviate that and get rid of some of the very last tired components that were on the car form when i bought it, i picked up a new set of Hasport linkages and all the OEM shift bushings. I even bought an NEW OEM CRX shift stock. They had so search the country to find one.

Shifter parts finally showed up.

After finding out that one of the new linkage was damaged on arrival i got it swapped out and put on the car.

Now with the new shiftier I can hopefully get a more direct feel and stop crunching gears while on hot laps.
After setting up the Datalogging feature i decided to build a switch on the center dash that would activate the data logging feature in the ECU. The data logging will record 25 min of ecu parameters from all the sensors so you can tell whats happening in your engine while your on a hot lap. It stores them into ram memory which you download onto a laptop and purge periodically. You can then play them back in real time and catch any failing sensors or other problems that may have occurred. In most situations is HUGE in figuring out what went wrong where and why. Its also good to just keep tabs on the overall health of the motor. Since I didn't want to datalog the whole time the car was on i decided to put a switch that id flip when going out for a hot lap or when there was a problem that i wanted to record.

I wired it to my red warning light on the dash next to the oil temp and pressures to remind me that I am data logging. In the picture below i have the bulb at half brightness due to how I am wiring it. I'm going to switch this up so that it illuminates more brightly as a reminder to switch it off when im on my cool down lap.

As the car was running and idling i heard a slight knocking sound. I narrowed it down to the distributor and pulled the cover off only to find that the magnetic pick up had some how come in contact with the CYP sensor and smashed of the pick up. The pick up had then bounced around inside the distro and pulverized parts of the magnet into flakes, These flakes that gummed up the other magnets and caused errant readings that i can assume caused the weird throttle cut problems I was experiencing towards the end of the last track day.
 |
| My view as i pulled the blank-out cover off you can see all the magnetic fuzz all over everything |

You can see where the spinning essentric lobe some how came into contact with, and cracked the brass bracket holding the magnetic pick up.
It took the igniter leads and sheared the a CPK and TDC signal power wire as well.

This is my spare distributor you can see the mounting of the black magnetic pick up box and igniter wiring where its all supposed to be.

And here you can see how cluster-fucked the old one got. I'm actually astounded that the car cranked and ran... Glad I found something to fix and glad I found it before the dyno session I had scheduled at the end of the week.

Lastly I got a old net book think pad so I can evaluate data after the sessions and make changes to my ECU if I need at the track. It sucks to rely on other people to have brought things you may need. With my own laptop now in my track kit i will be able to pull down and examine the datalogs to find stuff just like what happened above.

Lastly I did a quick alignment and called in for an appointment this coming Friday at Church Automotive for a tune on the new motor.

I'm also going to have them set up my exhaust switch and get some hard numbers on the losses and gains with the dB attachment connected. Then the day after I have an event at Streets of Willow for HFF challenge. Hopefully ill be able to run a full day? Fingers crossed!