So its been a little while as always, these do take a bit of time and effort to write and sometimes i'm so busy with work or on the cars that i just don't want to take the time write about doing- when I could just be doing.
By now, enough stuff has happened that i'm starting to forget things, this is basically what forces me to sit down and write. I guess i'll start with the CTR then get into the CL7 and tow rig as those kinda happened simultaneously.
So after the last post I had just gone to Chuckwalla and Buttonwillow in the Type R. A few weeks after those particular events was HFF challenge at Streets Of Willow. I decided to take CTR and run it a few session just to see how it would do there. I did zero prep on the car other than throwing in my helmet bag and some drinks in a cooler. I was on some relatively new re71R tires but it was also a really cold morning. We would be running the CCW configuration which a bit slower than CW.
I wasn't sure how the car would stack up so I gridded in the back of the Red group. After a 1:25 on my warm up lap I knew the car would be fast . I put down back to back low 1:24's then a 1:23 while dealing with some traffic. I was blown away that such a heavy car with stock suspension and HP could outmatch the likes of Corvettes and Vipers. Going the other (faster) direction without traffic I can imagine a low 23 flat or even dipping it toes into the 1:22's that is pretty insane to think that this car is within a second and a half of the CRX. I continue to be impressed.

A few weeks later and on the same tires as the last event was our Year in Final for HFF, again I decided to take the CTR. Partially because I wanted to see if I could get into the 57's and mostly because none of my other cars were ready. I swapped front tires to the rear and added a tow hook. Again, its really nice how easy it is to prep this car for a track day.

Tow hooked-

Video of fast lap here:
In the end I did manage to get in the 57's with a 1:57.8. That's right around what I'd imagined this car could do with stock power. There's maybe another half second in it somewhere but i feel pretty confident i'm near the performance threshold of this chassis with these mods on this tire compound.
I also took home the 2018 Unlimited Class Championship

I also picked up a rear carbon wicker flap for the stock wing, mostly because it looks cool. I'm actually curious to see if I can feel a difference, flaps like this can increase wing performance by as much a 5% so if that's the case here that will definitely be noticeable.


I've also agreed to test a MASIV radiator set up that's being produced by a good friends company. It's got a copper core so it has 30% better cooling rate than aluminum at the expense of some minor weight gain. It looks like a good drop in solution to help build some cooling overhead into the system- I know a few guys running these on boosted NSX's in Arizona with great result so i'm looking forward to getting Regan some promising data.
OK, now onto the Spoon car. I believe where we left off last time I'd just picked up a Euro-R front bumper and fender and had kindly been given some side skirts by a fellow Euro-R owner Nick Bright. Once I had everything I sent it all off to LTMW to get matched and painted. Within a few weeks I got the call that everything was just about ready to go.

Once back home I prepped it all to go back onto the car. I had a few brackets and trim holders to rebuy but I was really excited to finally get rid of some of the eyesores that'd been bugging me since I bought this car. It was always a back and forth on 'how much should i clean it up?' 'how much should i restore it?' so it was nice to settle that question once and for all. I feel like I hit upon a good happy medium.

Now that I had the new bumper I decided to redo the ducting on the air intake side and block off what would've been the front brake ducting on the old bumper.
I shaped a piece of 1/32" carbon fiber as a block off on the right side-

then added a NACA intake duct also shaped down on the left. This points directly at the air intake filter.

Once that was done it was only a bit more work to reinstalled the lip and put on the bumper on

Finally, a matching bumper and fender. Just these few things really started to make the car look better as a whole.


Trunk, wing and side skirts installed.

Now that the car was looking
fresh- pretty much the only thing left to do would be get the motor tuned then take it to the track. Shake downs are pretty much the
ONLY way to find out what you did right and what you did wrong,
especially on a car like this. Since you cant drive them on the street
you really don't know what's going to prove an issue until
you get it up to speed and temperature under racing conditions. I was anxiously optimistic to get it tuned and on track to see
how it all fared.
Around this time I got my tow truck back from Chris over at Wisecraft. I had dropped it off months prior along with the CRX to get quite a bit of work done on it. I was counting on him finishing it up because even if I'd finished the Spoon car I didn't have means to get it anywhere without a tow rig.
Great work as always, Chris had redecked the bed with aluminum diamond pate, built a fuel jug and tire storage rack that tripled as a splitter holder and a clamp for a nitrogen bottle. He also built a storage box for the race ramps and had Line-X come and coat the whole thing.


I also had a MadMax front faring put on to reduce drag and try to improve the MPG's on those long freeway trips. Having all this done was step 1 in a multi step plan of making a truly bad ass hauler.

Once it was home I did a few test loads of the Spoon car, since its by far the bigger chassis i'd be loading/towing, if it fit I obviously wouldn't have a problem with the CRX.
I lost some room due to the fuel rack but it was still able to load up and strap down the CL7 without a problem.


The trunk of the Spoon car over hangs the back of the truck but i'm still under the 3 foot law that requires a red flag (just to be safe I run one out the back anyways).

 |
| big boy |
Now that the truck was back and while I was patiently waiting on a few parts to arrive for the Spoon car- I knew now would be the best time to dig into the tow rig. While it was away I'd been planning stuff to do to it here and there but being the first domestic vehicle i'd ever worked on i really needed to take it all apart to see firsthand if anything that I was planning would even be possible.
I knew positively a few areas that would need fixes or changes- mostly all the aftermarket stuff the previous owner had put in would need going over. After that wench stuff, gauge stuff, main battery power, lights , mechanics and generally just making it more comfortable and safer.
First thing's first- as always...take it all apart so there is no going back.
There were tons of wire lengths that were just rolled up and stuffed behind the dash with questionable splices. This is all pretty standard for a pay job; Joe-schmoe hires a shop and they get it done quick and dirty and out the door to maximize profit. This work isn't necessarily bad for probably 60% of the customers. Honestly most people can careless as long as the lights and stereo come on, but if you know anything about anything that type of shit just cant ride.

For example he had some power windows put into the truck (good) but the way they were mounted to the stock regulators caused the plastic crank wire sleeves to crack rendering them useless. (bad)

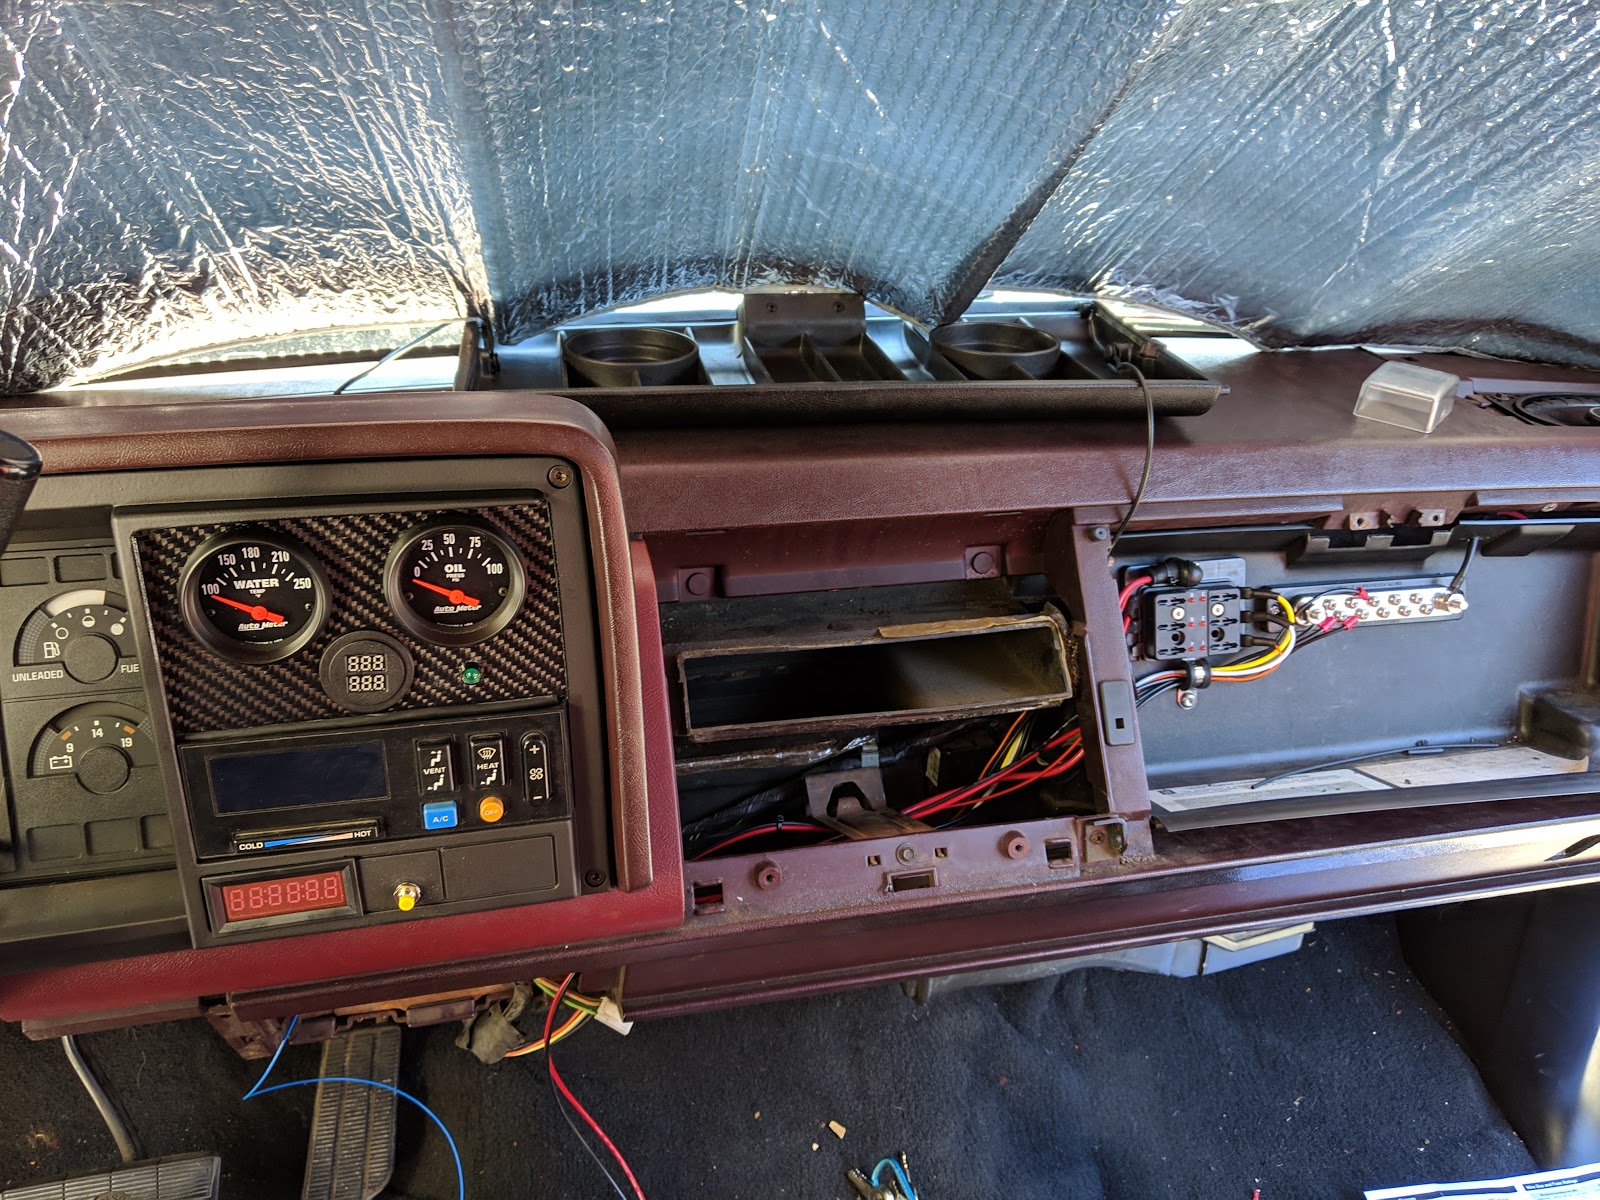
Another general complaint I had was the stock radio was function-less but took up the majority of the dash. It also relegated the one working aftermarket gauge the truck did have to under the steering wheel- where, coincidentally, you can't see from the driver seat. It also sat in direct contact with my knee. Also, the heater and AC brain was finicky- it would work some times... but never when you needed it to.

I started to make lists of parts that I would need to order. It seemed every night I would have another 3 pages of small things to get in order to complete this job or that - It honestly felt that i ordered more parts for this truck than I did when rebuilding the spoon car.

While I was waiting on some special order batteries to show up I decided to get to work on the control panel that I would used to toggle the functions being built into the truck. I used a 1/8 sheet of carbon fiber and trimmed it to fit on a switch box housing. I attached and water proofed the connections and ran the cables in a loom to sort out later.

The switch box came out looking pretty trick- The different on/off tags around the switches denote type of functions as well as a 'idiot light' LED for things that would not be so apparent if left on, like inner storage box lights, and lower back up LEDs etc. Last thing you want is to be the guy going down the freeway blinding people with rear facing lights you didn't know you had blaring.


Next would be to figure out gauge read outs. For a brief moment I had the Defi gauges I'd pulled out of the Spoon car in mind to go in, but after a bit of consideration i remembered why i took them out in the first place. For things like pressure and temperature I much prefer to read Lbs and Fahrenheit over KG and Celsius.
I ended up re-purposing the knee level oil pressure gauge and matched it with a new water temp gauge. Both the shitty incandescent bulbs they came in the gauges were replaced with cool blue LED's that would semi-match the main cluster. Also added to this panel- because I would be running two batteries was a double voltage readout. With it I can read voltage for both the 'house' battery and the 'starter' unit in one small 8 segment display. Its also blue and fit perfectly between the other two gauges. I made a card board template so i could transfer the shape and locations onto the same 1/8 inch carbon stock i'd used for the switch panel.

During all this time I was trolling ebay for a replacement uncracked dash surround, mine was sun damaged and chipped and basically just made the cab feel run down. I found a perfect one outta Utah in a grey color but otherwise perfect shape. Surprisingly, these types of trim pieces are not as cheap or as plentiful as you would expect them to be.

Another thing i was able to find was a brand new OEM lens cover for the gauge cluster. You can see the old one had a crack that ran down the right side and annoyed the shit outta me.

Another thing that was annoying me was the gear indicator in my cluster never worked. Not a big deal you would think- but the lack of a tachometer makes it really hard to tell if you got the truck in the correct gear. Once I realized that I'd been driving on the freeway in 2nd gear for a few min and probably burnt a quarter tank of gas just revving it out. Woops.

To fix this I had to disassemble and reattached the indicator wire from inside the cluster. Small shit like this just takes time to figure out and fix.

....all back together and good as new.

I made the carbon plate and test fit it in the new bezel. At the bottom of the of the bezel I attached an 'instance counter' and reset button. This is more or less a 'trip timer' it took me a bit of searching and ingenuity to get right but now I will know exactly how much time it takes to get A to B. Once the igniter fires the 12 volt signal begins a count up. If I kill the power and start it again it starts counting where it left off. The yellow micro switch on the right grounds the signal and effectively resets the counter. Like I said, i'll mostly be using this as a trip timer- but I can also time how long it takes me to load unload or really anything else.
Below picture was just a testfit. Everything would be straightened out before the final installation and the shiny black plastic primer would be replaced with matte black paint just like the one that had come out of the car. The green light to the right of the battery gauge is an indicator of the charging status of the batteries that comes from of the Automatic Charge Relay. I'll get into that a little further down.

Final paint done and JB welding the gauge plate in place. I've found over the years this is usually the best way to get something to stay without having to drill a bunch of holes or potentially crack the new bezel.

So after doing some reading about these old Chevys I came across an old 1980 tech bulletin that had something to do with the climate control brain. Apparently its known that condensation from the heater and AC vents that sit right behind it in the dash can overtime build a film on the foil leads. This can eventually cause intermittent non-response of the unit. The solution was to disassemble the unit, remove the boards and use a number 2 pencil eraser and gently scrub the foil leads as to not damage them. Shit, ill give that a try- better and spending $400 on another climate control brain.

Turns out it was exactly what I needed. Everything functions as if it were straight out of the factory.
Here's everything installed for wire length mock up.

... and the switch panel side.

Whats left was to build the bay side of the wiring and then to get everything to talk to eachother.

I picked up a water proof containment box and mounted the relays and power board on a non conductive UVF plastic sheet. I then started to build my circuits; The pic below was taken pretty early into layout, I'd end up rerouting and refining the circuit paths as i'd decide on late additions. Obviously i built everything in a circuit maker program so I could keep current schematics of everything with the truck in case i'd need to reference something on the side of the road.

I continued this work back to the cabin side where i placed a separate 'convenience' related fuse block. Doing so allowed me to run circuits independently- for example if I were sleeping in my truck and I wanted power for a USB charger or cabin lights- i wouldn't need to energize anything on the motor side of the electrical to do it.
About this time my NorthStar AGM deep cycle and Odyssey start battery showed up, this allowed me get to work on running cable lengths and main layouts. These batteries are the absolute BEST batteries on the market, made in the USA and are superior in every way. They're not cheap (at all) but they'll typically last about 10 years of hard use before you should even start to thing about needing to replace them. I just didn't want to have to think about batteries again for a while and its good piece of mind to know you have the right stuff when you're out in the middle of nowhere trying to get home. The plan was to wire in a master kill switch and Auto Charge Relay. Basically, I wanted a way to store the truck for extended periods of time and be certain of zero current draw.
To accomplish this i bought a Blue Sea Systems multi-circuit kill and ACR. I've wired it so I am able to completely isolate the batteries from eachother. I can also combine them to one output of 24v- or use one battery to jump the other without jumper cables attached. Trick.

rerouting of the main cables..

Fusible links used on all charge currents..


The real magic though is in the Auto Charge Relay. I have one battery, the house battery, responsible for running the winch and powering all the creature comforts. This battery also takes the charge directly from the alt when the engine is turning. The other battery is used singularly to start the truck and remains isolated in normal condition. The ACR relay constantly judges when to send power to keep both batteries full and conditioned. This means that if I mess up and leave the lights on on the truck i will only kill the house battery, but because I have another isolated start battery i'll always be able to start the truck, run the alternator and drive home-- at the same time as recharge the drained house battery. Clever. The system also allows me to monitor the charge status of both batteries at all times.
To fit the kill switch I removed the factory cruse control box off the cowl, I wont miss it because i would've never used it anyways.

The box in the upper left with the yellow is the ACR. I heat shrunk and split loom wrapped everything in the new harnesses to keep them looking factory and ensure they last at least a few years longer.

Once all that was done I started to wrap everything up and make the final connections. The only things left were really just some finishing touches to the cabin.
I blocked off the OEM dome light and ran wires to LED bars that i installed directly to the head trim as well as under dash.

Below is a picture of me testing the LED light brightness. I wanted to be able to find anything dropped anywhere in the cab at night. I also put extra lights down where i typically keep the cooler so i'm always able to see what i'm reaching for.

Now everything is starting to come together. I reinstalled the bluetooth stereo and added an ignition powered dash cam.

I also added a duel input high amp USB charger to where the old cigarette lighter used to be. This one is a 3000mah that'll quickly charge lap timers and go pro's and phones as needed.


Now that the interior was wrapping up I moved my attention to the back of the truck.
It was time to figure out exterior lights on the deck. I bought some well reviewed LED floods off Amazon and took the time to further weather seal them with silicone around the edges. This should help them last longer sitting out in the harsh environments.

Once I had them sealed I moved onto installing them on the deck and back of the truck. I wanted to have plenty of light when loading and unloading or needing to work on the car at night. These, of course, were wired up to the switch box in the cab.
 |
| These crossover lights are to illuminate the approach to the ramps. They also double a flood light for reverse. |
I also added more lights onto the tire rack on both sides and deck. These are positioned in a way that illuminates the areas around the truck and the side boxes. I had initially planned to put more lights inside the boxes but had second thoughts when I realized how much abuse they were going to take by the stuff knocking around in there. Also its just another place to give ingress to water and spiders. After installing these side facing lights i found that the mirror finish of the aluminum on the inside of the utility boxes actually perfectly reflects enough light into the boxes you can see what your doing.

These pictures were taken before I installed the weather proof sealed connectors and ran all the wiring tucked in nicely to the frame.

This is just he rear deck light without the rear loading/reverse lights.

Everything is starting to come together.

You'll notice I also added some LED corner markers, you'd be surprised how little people pay attention and will try and move over onto a trailer or flat bed at night.


All in all i'd say this was about 3 solid weeks of work and double the money Id thought it would take... but like with all things you take your time and do correctly i'm pretty happy with how it turned out.

Switch panel all mounted and hooked up. I made sure to brace it and add bumpers so it can withstand some abuse.

Cab finished with New seat belts, steering wheel and carpet.


One of the last few things left to do on the truck was refresh all of the wench stuff. To do accomplish this i bought a new all brass roller fairlead and built all new cables and wiring to the wench itself.

For the wench cable I decided on a semi synthetic core rope with a 20,000lb working load rating. I initially bought a synthetic rope but was a bit concerned that the truck and wench generally live outside in the elements. The stuff I got is a good inbetween of weight and strength its made by a specialty tow company and used on tow trucks and rigs.

You can see the synthetic center and multi stranded braid here when I was cutting it to size.

Cover removed and ready for install on the drum.

Once the rope is on the drum it has to be coiled and uncoil under tension to give it memory and prevent "birdnesting". I hooked it up to the Spoon car, pulled the ebrake and let it wench in slowly.


You can see where the rope was rolling into the brass roller edge from the scratch marks.

To fix the roll over I ended up getting some oversized brass key stock and shaping it down to fit between the rollers. I then counter sunk some allen heads and attached it to the bracket.


Now the rope may ride on the brass stock but it wont flip over the lip.

Next was all the shit that I didnt want to do out in the rain and dark after work. I brought it to a local Chevy specialist and had them replace the shocks. 2 broken motor mounts, reseal the transmission and do a few other odds and ends. Kinda lame paying shop prices to get stuff done I could have done myself- but in the end I can justified the cost by not getting myself sick laying under the truck in puddles for a week.
 |
| Sketchy ass lift? You betcha. Couldn't pay me enough to work under there. |
With that the truck was pretty much finished. I turned again to the Spoon car to get it ready for a shakedown, one of the last things that I wanted to do was get the air jacks working. I had replaced some fittings and rerun some lines during the summer when I had the car apart so now it was just pretty much down to finishing touches.
I got a new bottle of nitrogen and regulator and had some high pressure hoses made. I'd also ordered some super fancy bits from the UK, but per usual they were on the slow boat.
To make use of the air jacks for the upcoming tune and shakedown I installed some basic brass fittings that you see used on common air tools. Still well within spec for the pressures I would be running- but not nearly as cool as the billet quick disconnect stuff I had ordered. After getting everything all together and pumping the system for leaks I plugged in the bottle and the car hopped right up into the air. So cool.

Now that both the truck and the car were ready I booked a date to go get some dyno time and a new tune on the ECU.

Dyno day basically went without fault for the car and the tow rig. Its always a boring full day ordeal but in the end the car put down 226hp on an extremely conservative tune.

The day after the dyno I packed up the truck and made it out to Button Willow. I wasn't really sure how I felt the car was going to do. I mean, I know that its relatively light, has some decent power with some big tires under it- but I wasn't positive how all that would stack up once on the track. That and Right Hand Drive is a bit weird until you really get your head around it. I figured I'd not set a goal and just go with it and see what happens.

I will say; initially I thought the air jacks would be 'cool' but sorta gimmicky.. now having lived with them for a weekend at the track and a while at home in the garage.. they are super convenient. Makes me kinda want to put air jacks on my CRX..

Next morning comes and I grid up on track near the back of the pack, again I really don't know what to expect. Once out on track I took a good 6 laps to get comfortable with everything before I really started to push. Right away I feel that the car has great turn-in and much better high speed stability than i was expecting. I was able to go almost flat though riverside and kink, which isn't frequently the case in cars i've just gotten into. I attribute this to the long wheelbase and light weight.
Like I thought it would, the RHD took me quite a few laps to get comfortable with. It wasn't so much the sitting on the wrong side of the car but more having to think an extra millisecond before shifting into a gear. I was really cautious about NOT zinging the motor on 3-4 missshift and avoided doing any fast shifting as much as I could. I can also say that I was pleasantly surprised at how easy heel toe was on the floor mounted gas pedal.


After the first half-pace session I came in and gave the car a check up. I noticed that I was rubbing at tire on the external res line for the shock. A couple zip ties later and that was sorted out.

I also noticed that there was a mystery leak now coming from the top of the transmission. I could not for the life of me figure out where it was coming from. It looked like oil but there is literally nothing that should be weeping oil out that high up on the trans. It was annoying but not bad enough that it would make me sit out the rest of the event. I resolved to look into it when I got home...

A couple sessions later I started to gain more comfortably in the car and attack the corners. Once I actually started trying to put down fast laps I had a mystery fuel cut issue pop up. I'd be coming out of a corner and the car would bog and feel like it was missing, when that would happen I would watch my fuel pressure gauge drop down to 15psi momentarily then come back up. Something was up.
 |
| Looks good though |
The second and third sessions were plagued by the same fuel cut issue regardless of my fuel level and fuel pressure. In fact it was getting worse.
I assumed there had to be a problem with one or both of the pick up fuel pumps, but that was something that would have to wait till I got home to address. All i could I could do for the rest of the day was try things that would help me narrow down the issue. With Regan's help I decided to eliminate potential pressure drop by pulling the fuel sump out of the equation.

I bought some fittings at the track and rigged up a different routing path for the fuel return.

Good idea but it didn't help either. I resigned the rest of the day to hanging out, it was not worth chancing running the motor to lean just to get some slow laps. All in all, learning the new car, and fuel problems- the car was able to run a 2:00.1 with a totally botched misshifting lap. That is actually a good thing. I believe that the car is potentially good for a 1:56ish lap with some decent tires and development time.

Once I got home I pulled out the raceramps from the under truck storage and realized that they were probably to close to the exhaust, they were really hot and had partially melted in the center. Woops. I'll fix that later.

The day after the track when back in my garage I decided to devise a test to try and further narrow down what may be causing the fuel issue. I hooked up a battery and switch with different connectors so I could alternately test the out-flow from both the pick-up pumps and the main pump.

I hooked a hose to the tank pick up pumps and fired them up. I logged a flow rate of about 1.5 gallons a min. I did notice that even with the fuel line submerged in the collection jug I was still seeing a fair amount of aerated gas bubbling up. This possibly meant there was a loose connection in the top of the cell allowing air to be drawn into the system OR one of the pumps was only partially submerged in fuel.
Next I moved to the main Bosch 044 pump and pulled fuel directly out of the fuel sump container. The streams were nice and solid but I was drawing 2+ gallons a min flow rate.
From this data I can deduce-
1) I had a potential air leak on a fitting on the underside of the fill plate allowing air to be drawn into hose but not showing an obvious leak. If this air got into the fuel rail it would for sure cause hiccups since its a return-less system. Air in the rail would have no where to go except into the cyl during combustion.
2) I was drawing fuel out the the sump tank faster than it could be filled, thereby causing air bubbles in the fuel rail with the same result as above.
It could also very likely be a combination of both.
So what to do? My options were to tighten everything down, re situate the pick up pumps and cross my fingers that it fixes the problem... Or... go ham, nuke everything that I was unsure about and build it how I wanted using proven, modern technology.
 |
| aerated fuel :[ |
Probably pretty predictably to anyone reading this- I saw about 10 places I could improved upon the somewhat dated system. Firstly having 3 pumps (two of which were inside the fuel tank) is not simplest OR most serviceable solution. As an example, the prior weekend at the track i decided to sit the rest of the day out instead of going fishing around inside the tank testing connections and wiring. An ideal solution would be one where I could troubleshoot easily- and if need be replace a single external pump between sessions and get back out on track.
Also, in the intervening years since the car was built there had been some game changing developments in fuel scavenging. Most notably the Hydramat. Its essentially a net looking bladder that wicks any fuel touching any part of it into a continuous air free stream, I have one on my CRX and I can literally run the tank completely dry while sitting on a 45% angle. No brainier.
I was also dubious about how spoon had set up the fuel pressure regulator and return. Not only was it over complicated but it also had some line routing that didn't look like it was doing the job as intended.
All that being said I decided to pull the tank and see how I wanted to go about fixing things.

Once everything was apart the first thing I did was clean and check for damage.

Old fuel basically turns into a goopy varnish and sticks to everything like honey. There was one questionable connection- but at this point it'd be impossible to know if that was the sole issue.

Cell and sump removed.

Once I was sure that there was nothing wrong with the cover plate I enameled coated it and reinstalled the cleaned bulkhead fitting with all new crush washers.

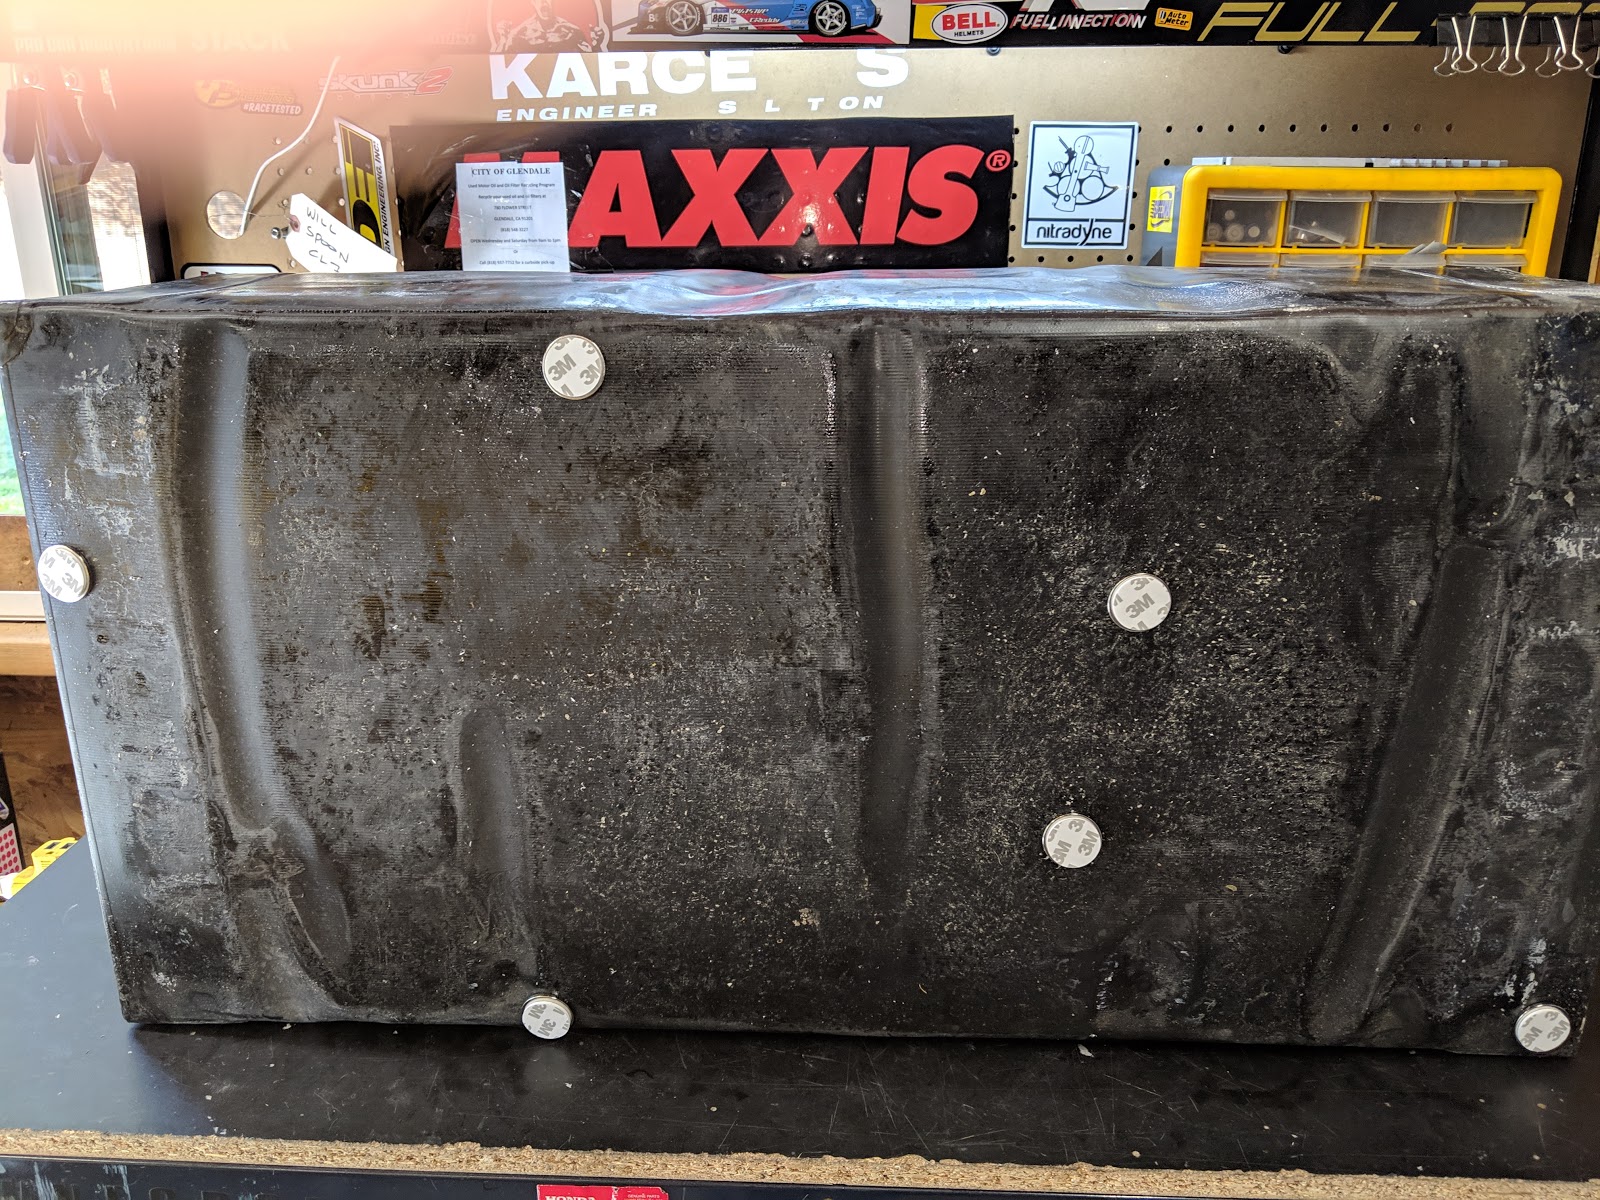
Next was to clean and rinse the fuel cell and remove the old foam. When I was pulling the foam out I remembered doing this right after buying the car, I had thought about replacing the foam back then but pushed it off to the eventual refresh/rebuild. Fast forward 4 years later, here was my chance.

I ordered 3 11x11" Holly Hydromats, a 3-1 Radium fuel junction and fittings. I also picked up some submersible fuel line, which FYI is different than regular fuel line.

I also got brand new 8x8x6 fuel cell foam blocks to replace the ratty-aging fuel foam that was in the tank.

Magical Hydromat.

to hold them in place I got some neodymium rare earth magnets with an m4 studs and nylocked them to the corners of the mats.

I then put the mats in the cell and affixed a magnet the other side to hold them in place. On the back of those magnets I applied some 3M stick to hold them in place inside the case. The mats are staggered rear, forward, rear so that at least one of the mats would be exposed to fuel on either braking and acceleration..
Once I was happy with how it would all be held in place I Oetiker clamped the 3/8th ID fuel line to the barbed fittings.


Once the cell was all together I turned my attention to the Fuel pressure regulator set up. As I was saying before I had noticed that they were running the main fuel rail feel line from what was meant to be the return volume of fuel. This was totally incorrect but some how managed to work all these years.
I had a FPR that I'd taken off of my CRX all those years ago that happened to have the correct amount of inputs to run to a 'deadhead' return-less system. After cutting some new lines and attaching everything the return line now actually returns bleedoff pressure to the tank- as it should be- while the metered side controls pressure to the fuel rail. I also added a dial gauge in the trunk on the FPR so i'm able to spot check pressures if i'm making any adjustments or trouble shooting pump/filter issues.

Now with the fuel tank stuff sorted I began to pull the motor so I could diagnose the mystery leak. It was really a pain in the ass to have to go this far but there is really no other definitive way to figure out the problem, or fix it, with the motor still in the car.

After pulling the motor and separating the transmission I expected to see a pretty obvious problem. There was not... The problem with flywheel side leaks is that there is so much spinning and whirling around that everything in the vicinity gets a fine coating of oil which makes the cause of a leak not always immediately obvious.

I was able to narrow it down to the engine side as the clutch/fly and input shafts had no sign of leaks

Clean and dry.

Now that everything was apart I removed, cleaned, honda bonded and re torqued the oil galley plug. I didn't necessarily think it was the culprate but when you're this deep into something you do everything you possibly can.


While the motor was out and I had it sitting on the floor I decided that i should try and pressure test the block to maybe give me some more clues. I rigged up my compressor with some fittings to the oil pan an gave it about 45 PSI, which is about half what the motor would see under full load.

While the block and head held pressure I sprayed soapy water all around the block and seals to see if I had any air leaks. There was one pretty decent one on the pan right near the inspection cover of the fly wheel... humm.

You can see here the path that the oil would have to travel up then get somehow flung into the starter and weep out the top of the transmission. Its a stretch- but i guess weirder thing have happened.


Even though the rear main was holding air during the pressure test I decided that i would replace it.

I also checked all the mating surfaces for any gouges or damage and found nothing.

Once I had the old rear main seal off I noticed that it has these sort of grippy ridge along the inner mating lip. I mean- all these parts are meant to do the exact same thing and are interchangeable throughout most of Hondas but i thought it weird that the new rear main didn't have that same design.

New rear main, smooth inner lip.

I plopped the new one in place, added a new clutch bushing and cleaned up all the old oil.

Next I resealed the oil pan with a liberal amount of Hondabond. These K series sure do like Hondabond

Also since it was out and accessible I also did another quick valve adjust and gave everything a once over.

I did notice that the fuel rail was missing the spacers that sit it onto the manifold. The rail was wasn't misaligned or loose and i don't think this had anything to do with the fuel cutting- but i installed a pair of them just to be sure.


Once I was satisfied I reinstalled the motor to the bay and started to get everything plugged in.


Around this time the package from the UK that I'd been patiently waiting for showed up. Inside were all my new air jack parts. I had found a set of brand new AP Racing air jack safety stands (which is a miracle because they've been discontinued for sometime now) and also got my a Krontec quick disconnect air wand and safety valve. This stuff is extremely nice, made of billet aluminum and designed and used in all the major racing series by all the major teams.
This is truly quality stuff and, if i'm being honest, is totally overkill for what I need. The temporary stuff I had on the car was functional and cost around $40- all in- from a local DIY store. This new stuff easily costs 25x the price but in my opinion is still 'worth it'.

Here's a pic of how the safety stands work. They clip to the extended air jacks and support the car in case of a loss of pressure in the system.

Now to mount the new valve... I'd have to figured out a way to get the new nozzle extended far enough out from the gill that I would still be able to actuate the red lever on the inlet. I needed to do all this without snapping the rather brittle aluminum fittings. To do this I bought a aluminum sleeve which i cut to size and slid over the internal fittings. I used some locknuts to clamp it down so the sleeve takes the weight of the valve and wand instead of the fittings. The new valve and leaver will allow me to lift the car, close the valve and unhook the air source from the car.

It attaches to the same place as the previous nozzle and just-so-happens to conveniently match the existing color scheme of the car.


Everything is back together and running, just in time for HFF round 1 scheduled for this weekend. I'm taking the Spoon car and giving it another shot. I really, really hope that the issues are all fixed and I can gun for the 58's at Button Willow. I've entered this car as Unlimited even though it should be classed as Mod/Super mod car so ill have my work cut out. I'm excited to see how it goes!

I'm mostly excited for the changes that are underway on the CRX. I'm dying to talk about them but i'm just gonna wait until its all finished..
teasers...

