Sunday, September 21, 2014

Keep on keepin on. the long uphill..


      Progress has been slow on the 86. Basically I am at the most labor intensive point where everything that needs to get done just takes tedious, repetitive, man hours to do. It is easy to lose sight of the end goal when you are mired in the 90th hour of grinding, wire wheeling and dental scraping sealant out of from every nook and crack. Its slow and deliberate work, but as important to the final outcome as everything else.

  ..it is like an uphill race; slow going until you get to the top and then its all downhill from there. Hopefully.


  There have also been other things that have distracted me from focusing on the build full-tilt.  Trips, work and other non-ae86 race car expenses (cough, new NSX motor, cough cough..) which have come in waves.

  Its especially hard to get motivated to drive the 45 mins to angle grind until midnight after working a full 10 hours at my day job... this summer heat hasn't helped either.

It took a concerted effort to get everything refocused and back on track. I set a goal when I started that it would be near done in 'the fall'. Still trying to stick to that.


Like I was saying, much of the last month or so has been a blur of scraping and grinding.
It's messy, it's LOUD, it's smokey and it makes your finger tips buzz for hours.

Bless this mess..i guess

   You may remember from previous posts that the majority of the under sealing was blasted off at the media shop, but the real PITA spots remained. After trying a verity of methods with varied results, we concluded that the best way was to select a section to work on, around a 16"x10" spot, and stick with that section ONLY until it was done and clean as a whistle. You can easily bounce around from spot to spot on the underside for hours and hours, then step back and literally see zero signs of progress. It feels like a never ending bowl of spaghetti; you can eat and eat and eat and never make a dent.


Step 1: choose a spot
Step 2:  wire wheel and get it down at least too some metal is showing.
 2a:

 Step 3: Bend up sections of the frame rail that you cant fit a pik into it
The red powder is the blasting media coming out of the rails when they get whacked

Step 4: Use a torch to heat up the area. You have to work in small sections and try to avoid breathing the smoke that billows off.

 Step 5: Immediately, while hot, scrape under the raised bits to remove chunks of sealant that could contaminate the welds.


Step 6: move on, and on and on...

Depending on what part of the car you are working on, how much sealant and how many different tools you'll use, I would ball park about 2 hours per section if its going easily.


A section like this, though, is going too take you all night...

Progress comparison shots. Here's the driver's side front wheel well..

Sealant in removal process.. You can see the rust spot has already been cut out.


 Prepped and stitch welded. Trust me when I say I look at these pictures with the pride of a new father.

Another HUGE section was the rear section under the 3rd member. It had the most left over under coating because the differential was in the way during media blasting.

Reminder of what we were up against:
**Shudders**

And after days and days of work we were finally getting somewhere. You'll notice in the upper part of this picture that there are nut-tab provisions for the fuel and brake hardlines...
Mid-prep

And a picture from after, prepped and welded. I also removed all the hard line provisions, I won't be needing them anymore due to the custom brake line and fuel set up.

Also removed were any unnecessary brackets and backing plates


Detail of a removed nut-tab grinded down.
looking down chassis from the passenger side


Since it had been a few months since the media blast, you can see some flash rust forming from the humid summer, this is normal for untreated steel. It will be taken care of just prior to rust coating and sealing the underside but i'm waiting until the metal working is done.  As of now there are a few last bits to go and some 4-link fabbing. I want to avoid painting things just too grind them away again. More on the prepping and sealing as it comes; hopefully not too long away now.


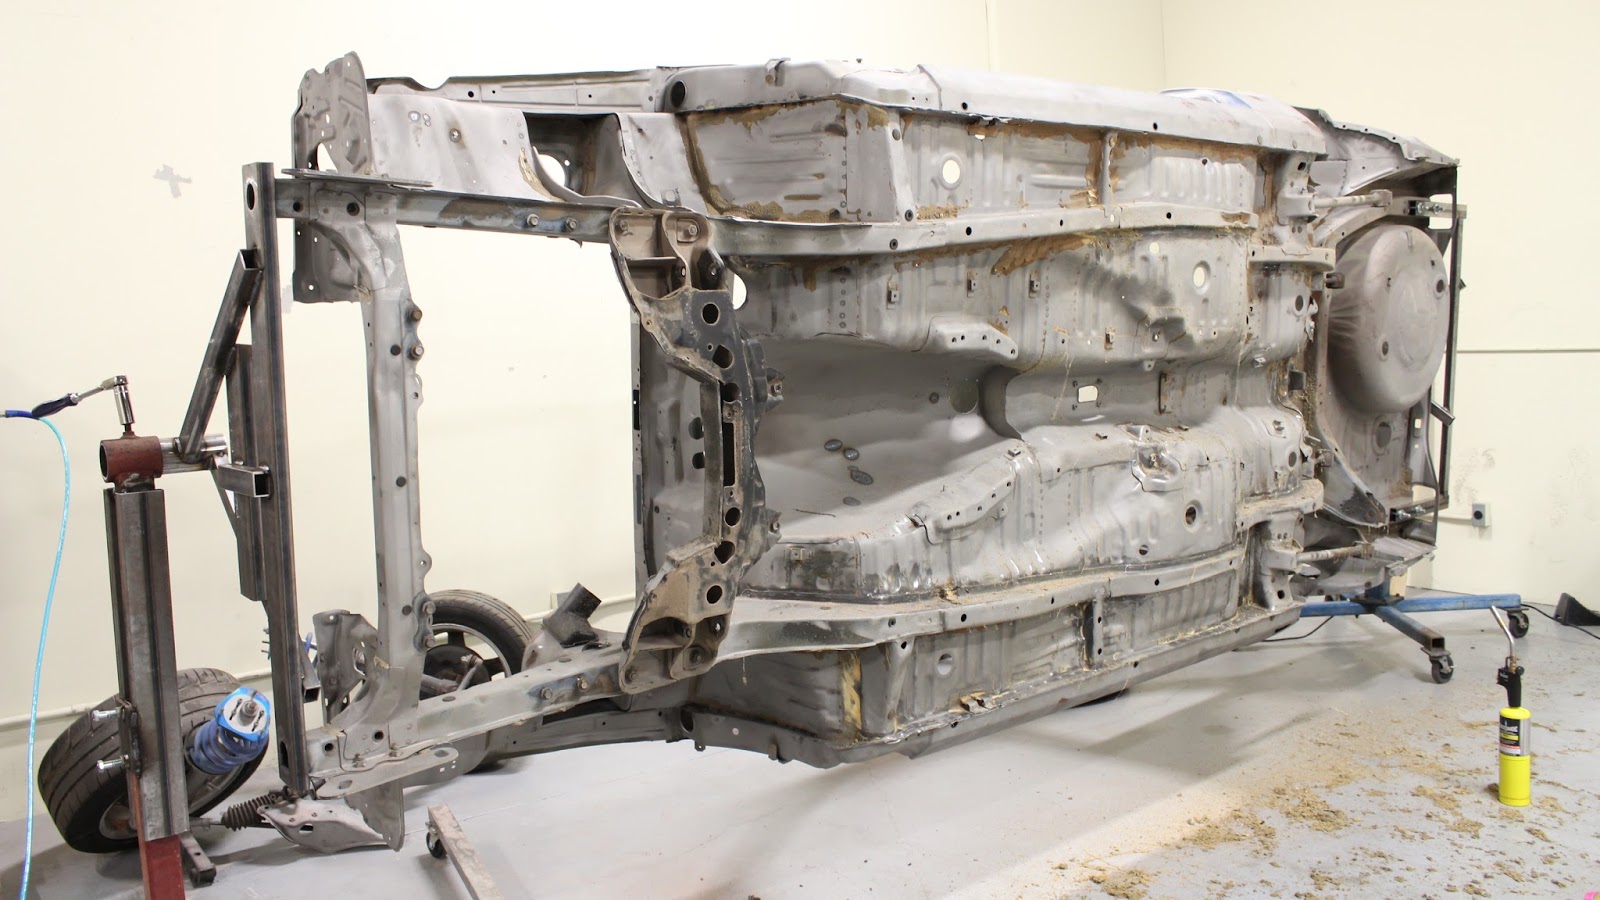
Full underside shots, maybe 100+ man hours of work between three people.  Shout out to my brother too for coming out and giving me a hand when on summer vacation.  
Dont mind the abomination of a trans tunnel, it will be gone soon.


 Now that the bottom was prepped, welded and cleaned out we could have stopped there. Instead we took the opportunity to do something unique and go that extra mile to stiffen up the chassis as much as humanly possible.

 Holes were drilled down along the pinch seams, these started in-line with the front strut and went all the way back too the rear cups, aircraft rivets were then knocked into the hole.
My bro with the japan-san head towel
Maybe 100+ in the shop that day

detail of some rivets pre-smashing with a bucking bar


Once the rivets are in place, they are clamped tight with a special tool. They deform to fill the already tight fit and mushroom around the edges.


This was followed down both sides of the car..


pass rear


The process took quite some time and it may be over-kill, but it's definitely awesome.

Next was something I have always wanted to do since owning track car after track car with beat up and destroyed jacking points. When I got the NSX, I realized how clever the engineers were to build into the chassis beefed up jack point provisions. It probably had something to do with the aluminum chassis, but I wanted something similar on this car. Art cut some tube length ways and fit it over the OEM jack provision and welded it on. 


Welded beads at the ends were added as an extra safety provision too keep the car slipping forward or backward off jack stands.


Art continued on with some more rust patching. This spot was the driver's right, floor side next too the door frame. The area above it was the old box that was used for the front legs of the old rollcage that had been cut out. These will be cleaned up as the new cage begins too take shape.


 Remember this rust hole?
 Patched!

USDM side marker lights deleted too. Removing these will clean up the look but also simplify the wiring harness that will need to be built.

The rear flairs showed up so it was time to cut the wheel wells and fit them. People usually bolt on flairs over the stock body but that negates the point of flairs- letting you run wheels that would normally be too wide too fit or just widening the wheelbase as much as possible.

The rear fender was traced and cut, along with it the hack job edges and rust that was there before.  


The inner lip is then cut and bent up. Typically, at this point, the inner lip is then welded to the outer edge and its called 'done'
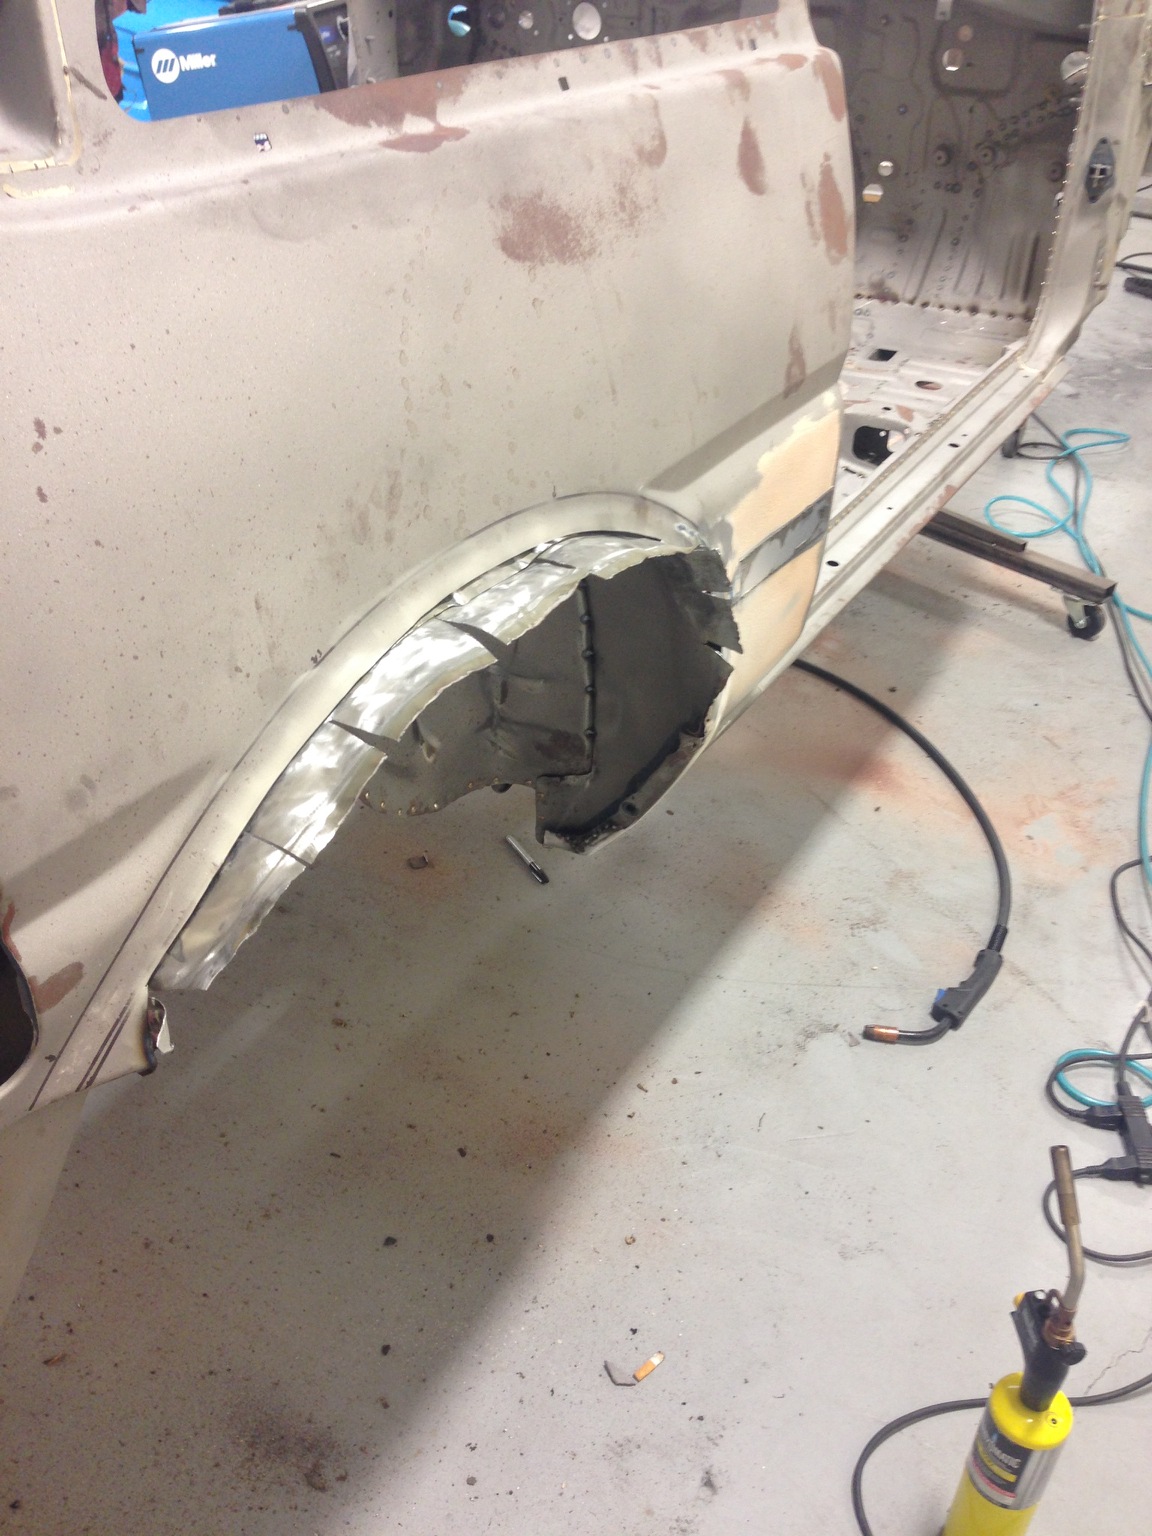
 

Art took a look and wasn't happy knowing that he could deliver something better. He then  cut off the inner edge.

After that, he began work on creating a template that would join the two edges more cleanly.

tracing the space, an awkward 3d shape.

refinement

transfer to metal
Hes got all the cool tools

Test fitting


final tacking  and test fit
side view

Top down, trimmed and finished.


flair mocked onto the car.

And the other side

With the flairs in place, it opens up some room for me to finalize the wheel width. I have a few ideas in mind but am hashing out details and doing the research.

As the chassis work was taking place, K1 was assembling my new rear end so I would have it back in time for the equal length 4-link phase. Everything was checked, verified and all wear items replaced. It came back looking similar to when it left, but inside all the parts that will keep the car on track after they'd seen the maximum amount of abuse.
You can see the ARP wheel studs and Cusco 5th-link bracket welded on. The only hint that this isn't your typical plane-jane guts GTS rear were the silver axle ends. Dust shields will likely be coming off after I test fit the s13 rear rotors.


    In other parts news, I have decided that I need something special for the seat. I had looked around for a few different options from some pretty cool small batch companies but couldn't find anything that really lit a spark. Every seat I sit in now I subconsciously compare to the one in my NSX. Its PERRRFFEECTTTT for my body size; comfortable and safe. I even thought about cannibalizing the one out of the NSX but had second thoughts after remembering how difficult it had been to get its seating position juuust right.

That's when it struck me that I should just search for another one. After scouring around for a while I came across what was a 'meant to be' situation. I found one in the 'rare in america' smaller size (like my other one) but this one out of a factory Porsche cup car. The very same type of car that I had alluded to earlier in the blog and credited with inspiring the mindset behind this build.

These seats are made especially for Porsche with specific markings and the ever so cool Porsche badge stitched into the backing. It's got patina, but I think it wears it handsomely.
King of the parts pile
I love the profile of this seat


More to come real soon. I feel like we've got some momentum going again.

Going to end this picture with a picture of my NSX. Deal with it.


Thursday, July 24, 2014

Onward, upward and sideways


OK. Not a lot has been happening, mostly been waiting on parts and waiting for Art to get his shop all in order so he could start to put some work in on my corolla.

During the down time I finished up some odds and ends on the motor since is basically the only thing I could do. Ive spec'd the build out into three phases and being at the end a big chunk theres really nothing else I can order until im able to start to test fitting and solidifying other ideas.  I've learned a few lessons about ordering too soon and buying twice- going forward I'm gunna take a bit more time and really figure out what ill need before dropping cash.

Still been waiting on some straggling stuff to come in here and there its still been showing up consistently albeit slowly.

Quick rundown


Floor plate with quick off plugs, Im thinking about using this to protect the ECU on the fire wall, not entirely sure yet but ill figure that out when i can get my hands on everything together.


Lexan windows finally showed up. Truthfully I dont know why I just didn't order blank sheets from mcmastercarr and just jig them myself. I'm likely going to do just that for the front window, after looking into track rules about this to generally see if its a bad idea to not have actual glass for any reason. Id like to be able to remove the window with counter sunk screws for better access to the BMC's and clutch master that will likely have close clearances. It will also save some serious weight, more on that later once I figure out what i'm going to do.


Next up is the KAAZ 1.5 way LSD. The US factory didnt have any in stock but the guys did me a solid and air freighted me the one I needed from Japan within a week.
 Ive been researching a bunch of Diffs for months now and this one was always really really well reviewed for grip driving. Best part is I'm able to have it rebuilt locally when the times comes, it was also a no brainer when I found out it was compatible with the Weir SC/Turbo axle kit I was looking at. Comes with hypoid oil for break in that will need to be replaced with a Lipoid blend after doing figure 8's for an hour. 


I left the LSD itself in the bag for pictures because I have a special place in my heart for how much I HATE the smell of gear oil. BLEGH.  You get the idea.


    Next, I went with the the Weir axle SC/turbo kit. These are the V2 and have a 28mm diameter and made of a more stout alloy than OEM. I had Spence at Weir leave off the wheel studs since ill be pressing in the extended ARP ones when the time comes. These come with Koyo bearing installed and are over-all beefy as hell.

 When i got the car initially I wanted to be certain that the rear end would be up to the task of the f20. Ive spoken with a bunch of people about my best options and after doing the math staying with the 6" rear end was going to be the best of all worlds. I could have easily pieced together a Supra rear or a Ford 8/9" inch that will be indestructible up to 900hp but they are MUCH more weight, reciprocal weight at that, and i didn't want to lug that around the track. The ae86 6" almost look toy sized but can actually handle modest power when built correctly. The car weight over all wont be much and im not planning on doing much clutch kicking. Its the shock loading that kills rear ends and thats not what this car is about.

   I choose to get the lighter option and see how it goes. I can always change this out if needed later.


Next is the seals and adapter gears for the differential that are made to fit the beefcake axles. very nice quality. Made in the USA, cannot be beat.


  Heres the Pinion spacer and shims to correctly load the pinion gear in the housing. The standard ones crush and deflect over time and eventually lose the preload spec. This causes misalignment that skews the gear on gear contact until they both get chewed up.  This kit is as beefy as the axles and will stop the initial deflections and keep everything from moving around.


Got the motor all together, had the injectors cleaned and balanced and reinstalled them into the AEM rail.  I totally neglected to document this process, and by process I mean i dropped them off and picked them up the next day.
   I painted a few parts here and there and generally just replaced the remaining stuff that was 'used' .
 Also wheel polished the front of the block where the grease pen that was used to mark the motor had etched itself the metal. It bugged me quite a bit and hell, I had nothing better to do. Its starting to look quite the part..


Also, third time is the charm. re-re-redid the oil pressure sender mounting. This time I shock mounted it and simplified the hose to be more compact. Also kicked up the size of the hose from -3an to -4an based on some reading I did on the subject. 


Next was the Oil pan, had some finishing touches done too, Art grinded down a spot for clearance of the non-power steering rack so it can sit correctly with the new mounts on the new cross member

After a hunt I found the correct threaded bung for the British oil temperature sensors that came with the gauges. They needed some work to fit correctly on the pan where they could be fully submerged next to the oil pick up. This is by far the best place to read engine oil temperature from you have a few other options with this motor off the head or block but those temps can run as much as 20deg more.  Ive used threaded and tapped oil drain bolts in the past but hated that you take out so much material from such a crucial bolt, then as it's already considerably weakened you hang a sensor on there too? yikes.    Thats a recipe for it to loosen while on track and bum you and everyone else out. 

My solution here was to place it as low as possible at the rear of the motor.
It was akward placement and needed a trim.


cut down the fins, fitting much better..
 Hole made.
 Aluminum filled in place.


Oil pan all mounted up and Hondabonded into place


The main progress came in the way of the chassis work. A few weeks ago I picked up a rotissere for the car, basically they're just two over grown engine stands. Best part was actually picking them up from John Mason, a family friend who has been a welder from everyone from Paul Newman to Penske. He's done work on Lemans cars NISMO Group C, TRD, BRE, Indy, formula, GTP, GTU on and on. 

The pictures around the shop and just hanging out chit-chatting is like being submerged in racing/automotive/aeronautic history. Great stories and great insite, im very lucky indeed to be able to do that. The rotisserie pieces we got, I was told, was last used too build a Lola t70 (!!!) awesome.

They had been sitting outside for some time and needed a bit of re-enforcing and lengthening before they could be slapped on the rolling chassis of my humble old corolla. 

After some clean up Art got to work and build a slightly less sketchy set up to get the car up in the air. 

Mega props to him for getting it up in the air on the solo after I fell asleep after work instead of coming to help. :[]  Im pretty sure techniques used were not OSHA approved.


cross member and 4 links are all coming off and being replaced with new ones.


  As you can see the media blasting got most of the sound deadening off of the bottom, However there were spots where it was literally over two inches thick and the blasters just kinda gave up. These spots all need to be down to the metal before the frame rails and mounts can be stitched to the floor pan. Even parts where theres no welding to be done cant have any residue or undercoat since the final stage is sealing the bottom with Whitecoate por15 inhibitor.  That product needs a totally clean clear surface to bond with the metal substrate and actually stick. Even though that step will come down the line after the cage, trans tunnel, sway brackets, 4 link boxes are all replaced and no more welding will be needed.. now is the time to prep all those areas while its all easily accessible.


Some more detailed shots:


Very straight chassis, thank god.


As you can see, when you use a angle grinder with flap pad it basically turns this stuff into cob web, its a total pain in the ass. I found that heating it up with MAP-gas for a few seconds then using a paint scraper will get off the big thick chunks, the remainder will grind down with a wire wheel.

Kyle marveling at how thin the metal on the car is. You can easily bend everything by hand if you wanted too, hence getting a good cage.


Another look at the rivets around the door frames, rear window to be done soon too.  

The removed 3rd member, this is going into K1 motorsports for LSD/axle and clean up, will go back into the car looking brand new.


I just like this picture oriented this way, very 2001-ish

When turning the car sideways you see how much media was just sitting in the frame rails and nooks and cranny's. After reorient it on the spit and give it a couple taps you'll see like half a cup of pink sand trickle down and accumulate at the new low point.Our guess is the chassis in this state weight about 650-700lbs


Next up is metal work for the cut-out rusty bits


More to come.