Tuesday, June 10, 2014

Simplify

So now that the car is actually getting work done i need to step up the pace on ordering the remaining necessities for the car and getting the motor itself to a state thats its ready to drop in.

You can see in these pictures that the oil filter is sitting on a pedestal connected to some water lines. This comes stock on the s2000 (and NSX for that matter) its an OEM 'oil cooler' as id come to know it. Its a water/oil heat exchanger and I assumed it did what it sounds like

 After taking it apart and really starting to dig into the topic i was surprised to find out that the name id a bit of a misnomer.
      Its primary function is too heat the oil up quickly for emissions and fuel economy reasons. Sure it does maybe have a secondary benefit; but as with all water/oil exchangers that benefit is quickly negated when both fluids are constantly at peak thresholds. 230+ water temps and 280+ oil temps are really not going to be trading a lot of heat. Worse so if i'm looking into getting away with a 2/3 sized radiator- all this is doing is increasing its already TBD heat capacity. Since im running a 14row stand alone oil cooler i started to really think if I should keep this in place.


Among other reasons i decided this is a good place to exercise the KISS (keep it simple stupid) principal. I.E- The more waterlines i have the more waterlines ill have to worry about. If I can simplify any thing, i will. Its position near the header just makes matter worse.

Luckily for me Honda enthusiasts are rabid and just about every single cross over part is well cataloged and documented.

After removing a couple things and looking at the factory service manuals I was able to confirm my suspensions and came up with a list of parts that id need to remove unwanted weight and properly delete the system.

Below is where the main return line attaches, thankfully its not a press in fitting and can be unscrewed (with some force may i add) The replacement part to plug this hole is off a Honda CR-v. Its a 18mm plug with a weirdo 1.5 thread pitch (pn # 11108-PT0-003)

Also since I removed the doughnut heat exchanger itself i would need a shorter filter shaft to thread for the Mocal sandwich plate onto. Its been removed already below but you can see the female port inside the circular hole under the wrench.
Turns out Honda has that part as well. its off a 02 civic SI (pn # 90015-PH1-013)


 The water hardline travels across the front of the motor and snakes down to the water pump housing under the intake manifold
 you can see the waterlines just above the main water outlet flange. The longer skinnier hose goes up into the ICV valve thats sits on the intake manifold (more on that later)

Close up of the area in question, the two exposed barbed ports will no longer be needed, the big one is the feel outlet from the water pump, the hose behind it stays. 


 They are steel press-in's to an aluminum housing. I removed the whole she-bang and sent them off to get welded shut. Instead of running barbed hose block off's welding them closed will ensure zero possibility of developing leaks like a clamped hose could.  Its the details like this that go a long ways for on track reliability AND fit and finish. 

While I was down the rabbit hole reading up on coolant passages and heat loads of the f20c i found that its one of the only Honda motors that doesn't use a tempswitch/pellet to control cold start idle within the idle control valve (ICV)

For those that dont know- on most cars there is a coolant passage that runs to a spring ball under tension. The ECU will look at engine parameters and run rich when under temp. To balance that extra fuel a temp switch or wax pellet holds open a provision in the manifold or throttle body as to run a stoichiometric balance of fuel/air. Once warmed up wax gets mushy and the ball thats under spring tension melts out of the way and closes the air channel. this triggers and the fuel map to switch to a leaner mixture. 

First glance at the f20c intake manifold you'd notice what looks like the same set up as described above. In most cases its a total pain in the ass to delete sense its tied into ECU logic that triggers the switch over in fuel maps. In this case, however, I saw some interesting differences.

 The motor reads coolant temperature from a different spot all together and the coolant hoses that route under Throttle Body (TB) are put there only too keep the throttle body butterfly from icing over and sticking open. Thats all fine of you live in Nome Alaska and want to drive your convertible sports car when its -10f out but for track driving its the opposite of what you want.

water line starts in the head above the black pulley and pipes into the bottom of the TB

 whats worse is it also plumbs the hot water back farther to the ICV in the middle of the intake manifold itself. Strangely, upon removal of the ICV you can see it goes no where...
stole this picture for illustration purposes
Apparently, its purpose is too heat up the manifold, thats it. The two ports under the blank square in the picture above are for the idle control valve. That black dealy-o  his thumb is on is basically just an air pump that acts as the wax pellet; cept this one receives instruction from the ECU directly about when to kick on. 

ICV hotwater loopty-loop

 So why is this such a big deal? Well- Mugen (Honda's factory blessed performance parts maker) has implied that as little as a 5 degrees (F) drop in intake temperature will result in 1% power gain. That means that a 25 degree reduction would result in a 5% power gain. All this free power too be had and theres no way im going to continue pumping 230 degree water directly to the intake runners.

So now its come full circle. Guess where the lower of the two tubes in the above pic connects too? 

Bam- right back down to the waterneck; the smaller of the two holes i'm having welded close.

This means that I have eliminated a roundabout and unneeded coolant loop that did nothing but heat up the stuff I am trying too keep cool.

for the TB and ICV ports I just drimmeled them down and vacuum plug them. Unlike the water neck housing itself there is no water pressure that needs to be kept at bay. By plugging the coolant feed at its source on the manifold gasket these passages are now inert, this is more for looks than anything.


Thats about 36" of hose i got to ditch from the engine bay, sweet


Next up was the ECU. I pulled out the AEM stuff and decided on running an oem ECU for a few reasons I explained earlier in the blog. After ordering the ECU i set to work figuring out how I was to get past the dreaded immobilizer.
 Basically Immobilizers are a proprietary Honda chip that requires the key itself to be matched with the ECU; If the ECU doesn't find this match it electronically locks out the motherboard form performing any ignition brainwork. This is good for a normal car- but im not even gunna use a key, much less a paired Honda key from and S2000. What to do...

 JDM Hondas don't have this chip at all; and likely some reckless chap realized this and decided to rip theirs out just too see what would happen....

With all the technical skills programming and development it took to design this ill tell you what happens.... nothing.

The ECU will now work with any key, or lack thereof.

pointing to the immobilizer

Its hard to miss, its the only thing that says 'made in Mexico' go figure. 
oh, hello


annnd goodbye

port once removed
 I am assured that thats all that needs to happen. I'll eat my hat if not, but for once something was easier and cheaper than expected..

Some finishing on the ECU lid too since i had it all apart and now it'll be exposed in the car for all too see. 

   All that coolant line stuff was a product of my ongoing research into which radiator i should use. I got the SPAL fan in the mail so I decided to mock it all up. Fan is a 13" puller and is rated at 1777cfm! Thats incredible out of a 12v electric fan only 3.5 inches thick.  The fan was chosen because it fits perfectly on either radiator i decide on.

Side note:   I often see sealed shrouding around radiators at the track, unless you are using the car to drive in traffic and need the fan too pull the maximum amount of air though while stopped this actually limits the natural ram air effect through the riffles while at speed. A sealed shroud causes high pressure pockets to form around the sealed corners that basically void that surface area with turbulence and stagnation. You end up only using the surface area that can 'breathe'.  Like everything you modify its a trade off between street and track. I don't plan on sitting in LA traffic in the 86 so an open back pull type fan is the best solution for for me.


Still on the fence about which one to go with. the Mishimoto type3 has a noticeably better build quality about it too.. humm :/


Some more deliveries that I just now unpacked to run though.

Tomei FPR, its a good idea to have an adjustable fuel feed for fine tuning, especially with the pump that ill be running. Tomei is one of the best names in the business and the type S FPR fit my specs perfectly. even came with -6an fittings to keep everything consistent. To the right from that is a radium oil catch canister. its got a washable filter element a oring sealed dipstick and a screw off or pet-cocked bottom. They are quite a lot more money than a typical catch can but the quality of these are unrivaled, Also designed and made in the USA. Next to that is a Mishimoto coolant overflow cyl. Its a really nice piece with a screw off sealed top and mounting bracketry. No way im putting the plastic bladder back in the engine bay.

Also picked up an izze engineering fault board to trick the oem ECU into thinking that there is still a functioning secondary air pump on the motor, the AEM likely just had this all disabled but im trying to maintain the obd2 port including the CEL functionality. Its really a time saver just having code tell you what the problem is instead of crawling around looking not so obvious clues; how would you identify an failing primary 02 sensor just by looking at it? You cant.
New mounts came in from JSP. these are the real deal mocked up perfectly to the oem motor mount locations and are built with some serious heft to them. I also get to use the TRD motor mounts i talked about in another post.
Just check out the solid aluminum blocks used to space the motor. this is quite a step up from the dom tubing spaced with a grade 6 nut that was in there before.

Random odds and ends, new engine water temp sensor, clutch slave, S2k CR non AC serpentine belt, some more gaskets and some gen-2 WIX filters.
Also unpacked the SPAL fan relay harness. Its self contained and only needs 12v power and to run the included water temp sensor. Im going to have the provision bunged into the radiator hose feed line. Going this route cleans up the engine bay harness considerably.
Areo catch needs no explanation, they've set the standard in race latches.

 I'm no longer going to use the OEM hood latch mechanism, its ugly rusted and I cant find a used one in better condition that the one I already have. These each support 400+lbs of force and have a hefty 'clunk' when they lock into place. They are use on LMP1 Toyotas for godsakes. As much as i wish- i wont be doing 200mph down the mulsanne straight in an ae86 but its good to know I could.


Last up are the good ole odyssey pc680 compact battery. i shit you not i've had maybe 6-8 of these things in the last 5 years. Yes. There are better batteries out there. Yes. These die quickly if there is ANY continuous draw on them, even when attached to a trickle charger. Also if they go low there's no bringing them back to life. But, BUT they are light. They have decent cranking amps for high compression motors and they are pretty freaking cheap when compared to everything else on the market.
 Also they aren't known for spontaneous combustion like the lithium ion ones and can be mounted in any orientation. Over the battery in the picture is the simplistic hold down bracket. Other batteries get so fancy with hold downs and charge up the ass. this one is clean simple and does the job. Also, Made in the USA.

Below that I also picked up a Painless battery toggle with 200 continuous amp rating and some boots. This will be mounted on the main switch panel and accessible while im still strapped into my seat. It'll double as a "i dont want to buy another pc680 battery" longevity device.


Monday, June 9, 2014

back from blast


Jumping right in..

I spoke with the media blasting place a few times in the last few weeks about when I could expect the car to be finished. I was told the first few times that they didn't start it because they knew it was going to be a big job and they wanted to clear the smaller projects out of the way before getting stuck on this one.

This worked out initially because I was waiting for space to open up over at Nitradyne where the fab work is getting done, but after a couple weeks I was starting to get antsy for a few reasons

 1) there was no progress on the chassis just sitting in some shop waiting to get blasted, I need access for measurements or whatever and couldnt just go take them.

 2) The space over at Nitradyne had opened up and Art was waiting to get going only to have me tell him that it wasn't done yet. Even though its out of my control, I don't like promising things and not delivering.

I called insistently for a few days straight and I think they got the picture. She called back and told me that the undercoat was 'brutal' and they had to rent a bigger compressor and buy a different nozzle with more 'umph'.. but it would be done on Saturday and I could come get it then.

Saturday rolled around and I picked up Art and grabbed a dolly from uhaul and headed over.

Sure enough, there it was sitting out front when we pulled up, cept this time it was a bright raw silver, as soon as I saw it I got stoked all over again on the project. At this point it is REALLY is a blank canvas. Small things like windows sealant and stickers that would have taken endless hours of scrubbing and scraping were blasted away. Now everything was lined up to start to peice it back together.

Saturday morning pick up

Hooked up to the 4Runner

We noticed right away that just like Id thought there was only the one spot of bondo right above the rust spot that needed to be repaired anyways. sweet. It's actually is a super straight clean chassis that is worth saving, relief.

I could tell the guy they'd sent in on a Saturday to handle the pick up wanted to leave so we we wasted no time, Art and I had it hooked up and ready to go in 5 min flat. There was the fine pink and red powder over everything but the 40min drive on the freeway to the shop would take care of most of that for me.

Towing literally felt like there was nothing attached to the truck. I would gamble to say that the tow dolly weighed much more than the chassis itself, it could literally be rolled around with a pinky finger

Coupla freeways later we arrived at the shop where I could get a closer look at what we were dealing with...


The roof was too thin to blast, instead of risking warped metal I just had them leave it alone. nothing a little aircraft remover wont take care of.

Its nice to have every bit down to the metal, it blasted away bits of surface rust that i was worried about without a trace. Upon the initial glances I found nothing new that i hadnt seen before, actually there were now less questions and a better idea of the extent of the metal work on the places that I knew would need it. All and all totally worth the money.

The bottom was nice and smooth, theres a few spots thet'll require some manual wire wheeling to finish up but its 98% gone and ready for stitching. i'd estimate its about 70+lbs lighter. That stuff is dense.


The engine sealant is basically foam and would just bounce the media off, no problem if peels off easly in big chunks with a flathead screw driver and some light taps from a hammer. The whole bay would maybe take 15min to remove.
Cross member is coming out and being replaced with a fresh painted new one with the correct mount set up

 Here you can see the rear speaker tray that'll be removed along with the trunk lid arms. The trunk is going to be held on with mini latches at the front installed in the gutters and toggle latches on the back corners. To access the fuel cell for fueling the trunk will be removed as a whole from the car. This allows me to run an aggressive GT wing set up and not have to worry about the opening arc of the trunk.

Heres the heinous trans tunnel it'll soon be in a dumpster with a more elegant solution in its place.  Most of the bracket provisions under the windshield will be cleaned up also. The cross brace of the cage will act as the 'dash board' to affix things too like the steering column, switch panel, cluster, kill switch. Most holes in the firewall will be plugged as well, looking into mil-spec connectors for the harnesses.


In the shop.. ready to go


Ive got much more to update but stopping here for the night...
 

Tuesday, June 3, 2014

Parts parts and more parts


 Years of scouring the internet has really given me some deep inspiration/admiration for extreme purpose build machinery I can read group B restoration threads for hours on end or flip through pictures of early Porsche 993 test mules or cup cars. There is something extremely elegant the way a meticulous approach and a singular goal pare road cars to their most potent form. Stark, but not wanting. clean. direct. simple.
 
    Funny thing is, typically the more you take out of a road car the more you have to modify things to stand on their own. Road cars are not inherently modular; everything is packaged for ease of manufacture and installation at the factory. Once you move or change a few things suddenly youve thrown something else out of wack. Its always a mixture of "while your in there" and "the head bone is connected to the neck bone..."

So as I'm busy tearing the car apart and making plans i've also been doing research and reading up. As I alluded too previously, the intent of this car is to be tracked hard often with the minimum of worries. The lessons ive learned building, reading about and tracking cars for the past 15 years have taught me, Simplify, overbuild, replace and update as needed.

"buy it right or buy it twice." the heartache of something cheap failing at the track is the worst kind. I'd rather be driving, not wrenching.

i think even before the car was confirmed as on the shippers truck I started buying parts. I didn't go crazy because I still had no idea what was actually coming on the car but I did buy a few things that I knew id need from the pictures I was sent.


I already knew that i wasn't going to keep the USDM boat anchors. I found a Goodline/runfree front bumper off club 4ag. I had actually bought a bunch of corolla parts from this seller years prior for my old car. When he saw it was me walking up his driveway all these years later he just laughed and said "its okay i'm on like my 10th 86 myself"


the bumper came as unpainted fiberglass, I did some minor body work on it and plasti dipped it black-- This was back before I was headfirst into the build and I thought I was going to keep the car blue as it came. Black bumper on a blue car was an easy solution to the white unprepped fiberglass

Once I realized what I was in for on the build as a whole and that the car would eventually need full repainting I had to spend an afternoon in the garage peeling plastidip for HOURS. Now the bumper is back to white and can be painted to match whatever it is I settle on.


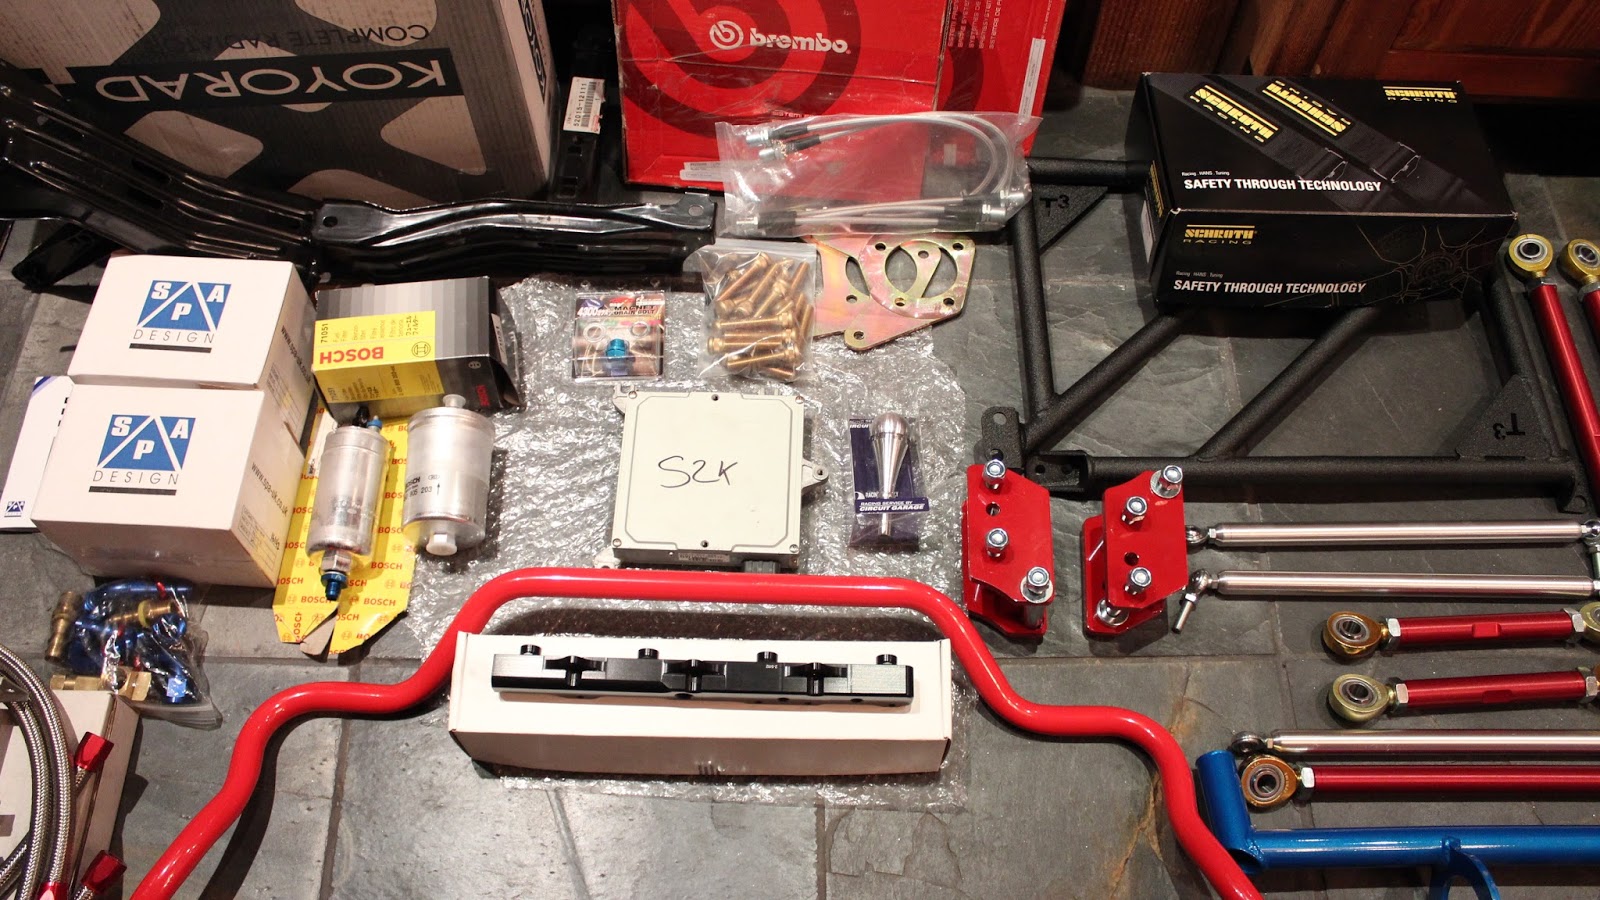
Heres a picture I took of my parts pile a few weeks ago, im still getting deliveries almost every other day. Whats been the toughest is keeping track of the smallish things. they tend to be the most expensive and easy to misplace.

A quick run down- right to left of the above picture.

I bought every single thing for the front suspension. I upgraded where I could and added adjust ability where necessary. Theres some Cusco and Tanabe here and there but I have been continually impressed with the quality of t3 components. They overbuild, use high quality alloys, solid machining and I like that they are made in America with domestic customer service department. JDM bling gets points at NOPI but if I need something replaced by the next day i'd like to have that as an option.

 Schroth Pro racer 6 pt harness. I actually got this as an accident when guy at the local porsche shop did the bait and switch. I went in to buy the clubman which is about half the price of the pro racerII and he gave me this one, charged my card for $600 and I was home before I realized what had happened. Ive been meaning to exchange it as they said they would but at this point im thinking i can chalk this up to spilt milk.


AEM fuel rail to tie into the planned fuel system, I want to keep the sizing consistent and minimize the need to use adapters from -AN to NPT or BSP wherever i can. the bonus with the AEM rail is it comes ported for Fuel pressure gauge and the same 6-an size as the rest of the system.. more on that as it comes..
  Replacing the AEM ecu with a OEM honda one, they do more than fine on track and theres no need to tune them and you'll never have weird start up issues and mid throttle response issues, plus i get to sell the AEM one.


   Since I decided not to use the OEM fuel tank with the internal fuel pump I stepped up too a BOSCH high performance 044 pump its 160-220 LPH@ 5 bar. This is actually the same pump used on current indy cars,  many e30 m3 racecars use thse pumps too so its just about perfect for the f20c. No overkill I just dont want any fueling issues. Best part is I was able to get it with -6AN fittings installed, and since its an inline external pump it will be easier to mount and wire. im likely going to have a shielded cubby space welded under the 4 link specifically for this. Next too it is a BOSCH inline filter. These were made specifically for the '79 Mercedes 450 they are again in line style and filter down to 4 microns; even with that capability their girth allows them to still flow extremely efficiently. They actually use these as the filter element of porsche cup cars and on Indy lites. The thread inputs are m12x1.5 and I conveniently happen to have some m12x1.5  to -6AN earls fittings leftover from my NSX oil cooler debacle, so that worked out nicely. I did buy 4 of them since ill be running a brand new fuel cell with closed cell foam. They've been known to shed bits for the first year and clog filters pretty quickly. ill just have too keep and eye on it and replace as necessary.
Next to the pump above are the SPA technique gauges. Ive been eying these for some time, they are designed in the UK but assembled here in the USA, similar to STACK you'll see them used by privateer teams in some bigger racing series, i even recently spotted them in some picture of a couple GTR's and RX7 at Tsukuba. I've had Greddy, Defi, Apexi, HKS, Omori in the past but this time around I wanted something different. 
 Seems like the trend now days is for Japaneses manufactures is to lock you into buying a brain then piece on gauges and sensors. Before you know you easily spent $1300+ on a pretty basic set that can only run proprietary sensors and has ZERO English support. Shelf life for any of big JDM gauge lines seems to be around 2 years until they move on to another software driver and you outta luck unless you upgrade everything. This means by the time we get them in the US and the US branch of the company figures out how to market and sell them they are halfway through their supported (in japaniese only) shelf life.

I like that these are no nonsense two function display per gauge. They can be programmed to drive external warning lights and beepers at triggers which is a must when on track with you helmet on. They came with all the sensors required and have a nice substantial feeling to them, they also match the s2k gauge cluster color perfectly; not that i actually give a shit about that type of thing. 
water temp/fuel pressure
    For the brakes I've picked up some straight forward stuff. my current idea is to leave the OEM GTS brakes up front and put some pads decent fluid and lines. I rebuilt the calipers and am going to give this set up a chance. For the rears I got the AJS ears and adapters to run the OEM calipers (also rebuild) on a larger (thicker) s14 disk. Rears will obviously also get some upgraded pads and lines.  The weight im thinking the car will be around seems like this set up will be sufficient, But who knows. I may end up with FC calipers or Willwoods in the long run; the investment in Pads lines and brembo blanks is worth it too me to judge for myself if I actually need more stopping power. 

People tell me all the time how bad their NSX brakes are. I actually own a BBK for mine that's just sitting the a shelf because i've found the OEM brakes to be more than adequate. So much so i'm actually down grading the pad compound from HC+ Project Mu's because they are too touchy.  I keep going back to Porterfield R4S all around or an R4S/S4 compound stagger. They are not really bitey but super linear in all heat conditions which suits my style. They seem to last forever, are quiet and have good rotor life. Also made in the USA. Im going to run heat stickers on the caliper to get a good idea of whats going on and decide from there. Also ARP wheel studs and steel Work lugs for the option of running spacers as needed.


Heres the mocal 13row with thermostatic sandwich plate. I plan on bracketing it next too or in front of the radiator depending on how it all shapes up. Surprisingly I don't see many s2ks running the track with oil coolers too often. I have no idea why not but its a good cheap insurance policy out in the California desert in August. I have to get another filter adapter since this one didn't fit but the plan is to run the OEM water cooler along with this air element. I'll seal it all off on the induction side and am working out some  ideas on how to run a low pressure draw through set up. These type of things depend on other stuff but ill do my best to make it happen.

    Speaking of cooling I got two radiators that im potentially going to use. One is a Mishimoto 'race' application. Its the biggest and best of the 3 they make for the 86, it came with the car and it the larger option of the two i have but the intake and return ports are on the wrong side for the motor for the f20c. Ill have to get cross over pipes made and probably some support brackets to run it. My other option is an EK9 type R civic KOYO race radiator.

     Its 4 inches less wide than the Mishimoto but the bungs are on the correct side. Apparenty the width being less is a good thing, it allows the intake tube to the throttle body more room for a straighter path which reduces air turbulence.  Either way, this or the Koyo, im going to have to have some aluminum coolant lines made since theres really nothing OEM that fits the bill for this problem. I bought an s2k Koyo originally but found that its too tall and wont clear the hood. Since theres no room for a v-mount ill just go with the simpler solution.
  Shorter is better as far as pipe length in which case the Koyo looks like the one ill use, I just have to get over myself and years of shit talking half-size radiators.
Even though this isnt technically one i feel i've talked myself into a corner... but now im thinking about it the koyo width should fit perfect with the oil cooler slotted next too it. Either one of course will have an aluminum overflow tank and sit next to a Radium catch can. (not pictured)

First thing that i knew it needed was a new clutch, I picked up the Science Of Speed sport clutch and ultra light STU forged fly wheel. This one is 8.5 bs compared to 14lbs for oem. Since it reciprocal weight that's equates to a HUGE savings over the stock set up and should technically be a tad easier on the rear end.

  I have spent a small fortune with SOS on NSX parts over the years. I actually have a very similar clutch and Fly wheel combo in my NSX. It was nice to find out that they R&D and produce great stuff for the s2k too so this purchase was a no brainer. Again Its incredible how much lighter this stuff is compared to my used worn down OEM fly. obviously new oem bearings and clutch master stainless line and slave to go with it.


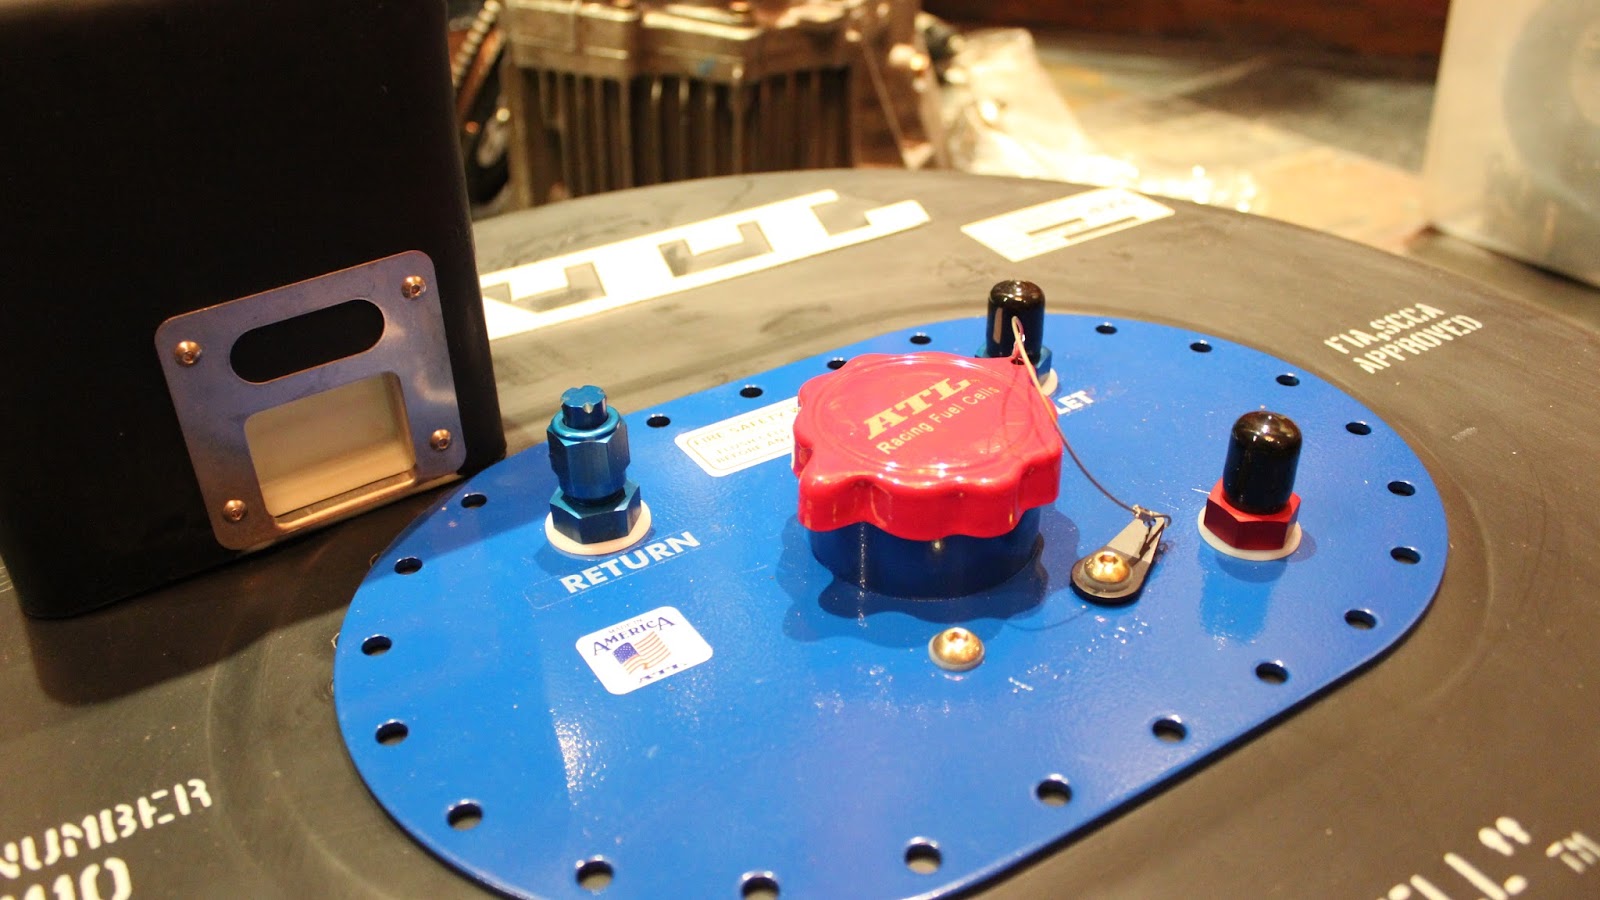
   Below is my solution too the shitty fuel lines the car came with, its also a fix for the inherent fuel starvation that comes built into the stock tank design at anything under half. This is the 12 gallon 'well cell' from ATL I also picked up an inbladder trapdoor sump tank. This one actually fits perfectly in the spare tire compartment of the 86 and is SCCA and FIA compliant.
   I went through many days and nights of research looking into fuel sump set ups. The cost and hassle of 3 fuel pumps, a sump container and all the ancillary wiring and plumbing didn't add up too me. It seemed mega overkill for a OEM ecu running an NA 2.0 motor. i cam across a MG racing website where some old Brits figured out if they just adjusted the fuel return line to just dump directly  the top of the baffled 'trap door' sump they'd always have a direct supply of fuel dumping right next to the pick up with no where else to go. In addition to simplifying everything, you maintain a closed system inside the bladder itself without the need of multiple pressure pumps. Its not a perfect solution but a clever one i plan on stealing.

 again -6AN for fuel line consistency comes with flip over protection valve and a provision to properly vent the fumes. For now I left it pretty bare bones. Once I figure out the trunk set up ill order or have fabbed a filler neck extension that wont interfere with the GT wing placement i plan on running.
     An added bonus to running a fuel cell is that i can weld/rivet shut the OEM fuel door and not have to run a cable popper into the cabin. Stuff like that is subtle and a perfect example of less is more.


Below is a pic of the fresh cross member I needed. Took a few hours of wire wheel cleaning but its ready to be correctly notched to be used in conjunction with the JSP f20c swap kit (itll get repainted after the welding). I ended up getting the for free off of a tip from Art. I drove to a sketchy neighborhood in Long beach where i was to pull it out of a car siting in some weeds in a guys back yard, i was about to bail on the whole thing when a loc'ed out homie was walking me into a back ally to get to the car..
  Long story short, guy ended up super cool helped me take it out in the dirt and heat then refused any of the money i was trying to give him for it. It was humbling, props to him.
  I also picked up some Cusco motor mounts only to find out that they lower the motor by 20mm. Thats good for anyone with a 4ag or an 20v but bad for anyone with a f20 like myself. If i tried to use them the motor wouldnt clear the steering rack.  I figured this out too late but early enough to source and order some discontinued TRD mounts. They are yet to arrive but hopefully will be here soon. I also grabbed some delrin steering rack bushings for the re install.

When taking the exhaust off a few days after I got the car all I had to do was wiggle it around a little and it snapped off right at the OEM 2 to1 collector. I knew it was cracked or had a hole but it was so rusted so bad it crumpled like aluminum foil. After talking to some honda people I found out that the ap2 header has a wider runner ports and is slightly more efficient @ mid and upper revs. Its OEM quality and you can typically find them for a smoking deal.  This particular one is off an 06 that the guy turboed at 5k miles. Its practally brand new and had been sitting in a garage waiting for me to buy it for 10 years.
  Maybe going to ditch the heat shields when its time to go on the car, gotta see how it sits. New gaskets and 02 sensor waiting too.


speaking of which, as i go ive been buying new OEM gaskets, stoppers, sensors and cyls. The motor is getting a pretty through refresh before it goes back in. Im doing pretty much everything but the head gasket leakdown revealed healthy compression across all 4 cylinder.
The block got a overdue cleaning too, never mind the ugly valve cover. This is only temporarily on the motor until its safely back in the car and I can swap on the real one with out damaging it. Also got a sweet Mugen oil cap and added Phenolic gaskets too where applicable to keep intake air temps down.
 Pre oilpan removal, that will be taken off to be notched to fit the crossmember and cleaned before its reinstalled too,


Pan removed.


awaiting parts. Runfree bumper peeled and back to white and sitting in the background
Intake manifold remove disassembled and cleaned, it was NASTY from all the ap1 blow by from the crank vent. I replaced or will replace most of the sensors for new OEM ones


Also took time to make block offs to clean up redundant or unused smog systems. This one is made out of carbon and covers the secondary air pump. ill have to jump a lead on the ECU but I can do that later on when its in the car


refreshing valve cover.

aircraft remover-ed the OEM wrinkle finish..
 Considered leaving it raw. I even cleaned it up and clear coated it but it looked sorta cheap. I didnt take any pics like that but you can get the idea.
Black wrinkle finish think fits the build much better, looks OEM

 ill post better picture of it soon

There quite a bit more but thats long enough for now..